From zero to
your first EPUB
Make a two-chapter book, then explore every menu with examples, result checks and recovery guidance.
Screenshots: Web v4.2.0 • 4 Sep 2026 · Content revised 5 Sep 2026
Use the language link above to keep your section · Select a screenshot to enlarge it · OCR/Scan remain placeholders
No matching sections. Try a menu name or a shorter term.
Section 1 / 18
Meet EpubCraft and get ready
EpubCraft creates and edits electronic books: write text, organize chapters, build a table of contents, add a cover, images and fonts, check problems, and export a book file. Open the EpubCraft web app to begin. This guide starts with the Visual Editor, so your first book requires no coding.
Understand EPUB before you start
EPUB is a book file opened in an ebook reader. Most text reflows to fit the screen and the reader’s font size, so page counts and line breaks need not match across devices as they might in a PDF. EpubCraft has a preview for early checks, but you must also open the exported file in your target reader.
| Task | Where to go | What you get |
|---|---|---|
| Create or import | New eBook / Import | An editable book with chapters |
| Write and organize | Chapters / Editor / Outline | Content, reading order and navigation |
| Style and describe | Assets & Settings | CSS, fonts, images, cover and metadata |
| Check and deliver | Health / Preview / Export | A reading file or a ZIP for continued editing |
Prepare your materials and choose a route
- Use a computer and your usual browser so you can see the editor and preview together. Create a folder such as
EpubCraft-Practicefor downloads. Avoid private browsing for work you want to retain. - Prepare a short text and a JPG/PNG cover you have permission to use. If you do not have a cover yet, skip it in the practice exercise and add one before publication.
- New users should follow Your first book, then explore menus 03–18. If you already have a manuscript, start with Import. A glossary is in Reference.
Section 2 / 18
Practice: create a two-chapter book from scratch
Your goal is a practice book named My First Book, with two chapters, working navigation, an EPUB and a Project ZIP. Both language editions use the same English sample names and text so you can compare results. If you use your own Thai text, set Language to th instead of en. Work at your own pace.
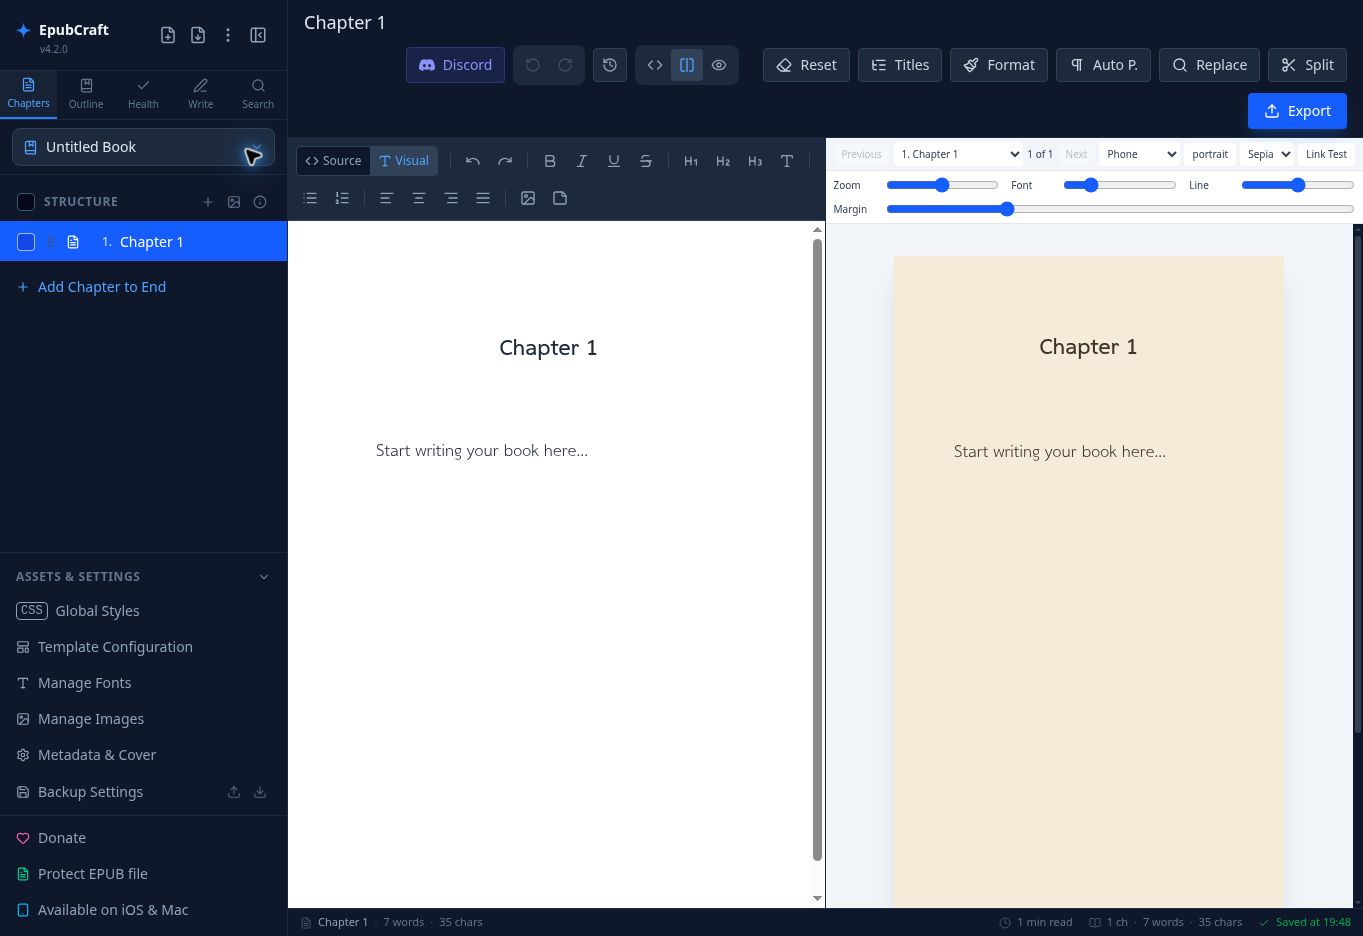
- Open the app and start a book: open EpubCraft in another tab. Close Getting Started with × if it covers the workspace. Back up any existing work as ZIP, then click New eBook at the top left. Read and confirm any prompt. Look for Untitled Book and Chapter 1.
- Describe the book: in Chapters, open Assets & Settings → Metadata & Cover → Basic. Set Title to
My First Book, Creator to your name, Role to Author, Language toen, and Description toA two-chapter practice book.Upload a cover if available. Click Save metadata, then reopen the dialog to confirm the values. - Write chapter one: click Chapter 1 in the list and change Chapter Title to
Morning. Choose the Split layout, then Visual inside the editor. Remove only the starter text in this practice chapter. Type Morning on the first line, select that line and apply H1. Start a new paragraph, choose Paragraph, and typeThe garden wakes in the morning. - Add chapter two: click Add Chapter to End below the chapter list. Select the new chapter and set Chapter Title to
Evening. Add an H1 heading Evening and the paragraphThe garden rests in the evening.Switch to Morning and back to Evening to check that the text belongs to separate chapters. - Build navigation: open Outline and click Build default TOC if the list is empty. Check that Morning and Evening are included in that order. For these main chapters, use bodymatter, chapter, and keep Linear enabled. Section 06 explains these settings.
- Check appearance: keep the default style for now. In Preview choose Phone, try Light and Dark, and inspect both chapters. Headings and paragraphs should be distinct and text should not overflow. If text seems missing, check which chapter the preview is showing.
- Check readiness: open Health and choose EPUB 2 for the Standard EPUB used in this exercise (choose EPUB 3 if exporting EPUB 3 instead). Fix any default title or author. If you skipped the cover, treat this as an unfinished practice book and return to it later; do not use Ignore just to hide the warning.
- Export and back up: choose Export → Standard EPUB, review the filename and preflight, and click Export Now. Wait for the download and move it into your practice folder. Export again as Project ZIP. If offered HTML/TXT chapter options, choose HTML to preserve formatting.
- Test the real file: open the .epub in your ebook reader. Open that reader’s table of contents, select Morning and Evening, and increase the font size. EpubCraft’s preview alone is not proof that the exported file is ready for publication.
Section 3 / 18
Find the menus and read the screen state
The sidebar on the left selects a task, the editor changes content, and Preview simulates the reading result. Switching a sidebar tab is different from switching Source/Visual; changing preview settings does not rewrite your manuscript.
| Area | Controls and use |
|---|---|
| Sidebar tabs | Chapters manages chapters and assets; Outline manages navigation; Health lists issues; Write sets goals; Search searches the book. Click a tab and verify that the panel heading changes. |
| Workspace layout | Code shows the editing area, Split shows editor and preview together, and Preview focuses on the book. Start with Split to compare edits with their result. |
| Content editing mode | Source displays HTML; Visual displays formatted text and its toolbar. If Global CSS is open, select a chapter in Chapters before returning to writing. |
| Top toolbar | Undo/Redo and History help recover work; Reset/Titles/Format/Auto P. transform content; Replace/Split are bulk tools; Export creates a file. Your first book does not need every button. |
Open hidden menus and close dialogs safely
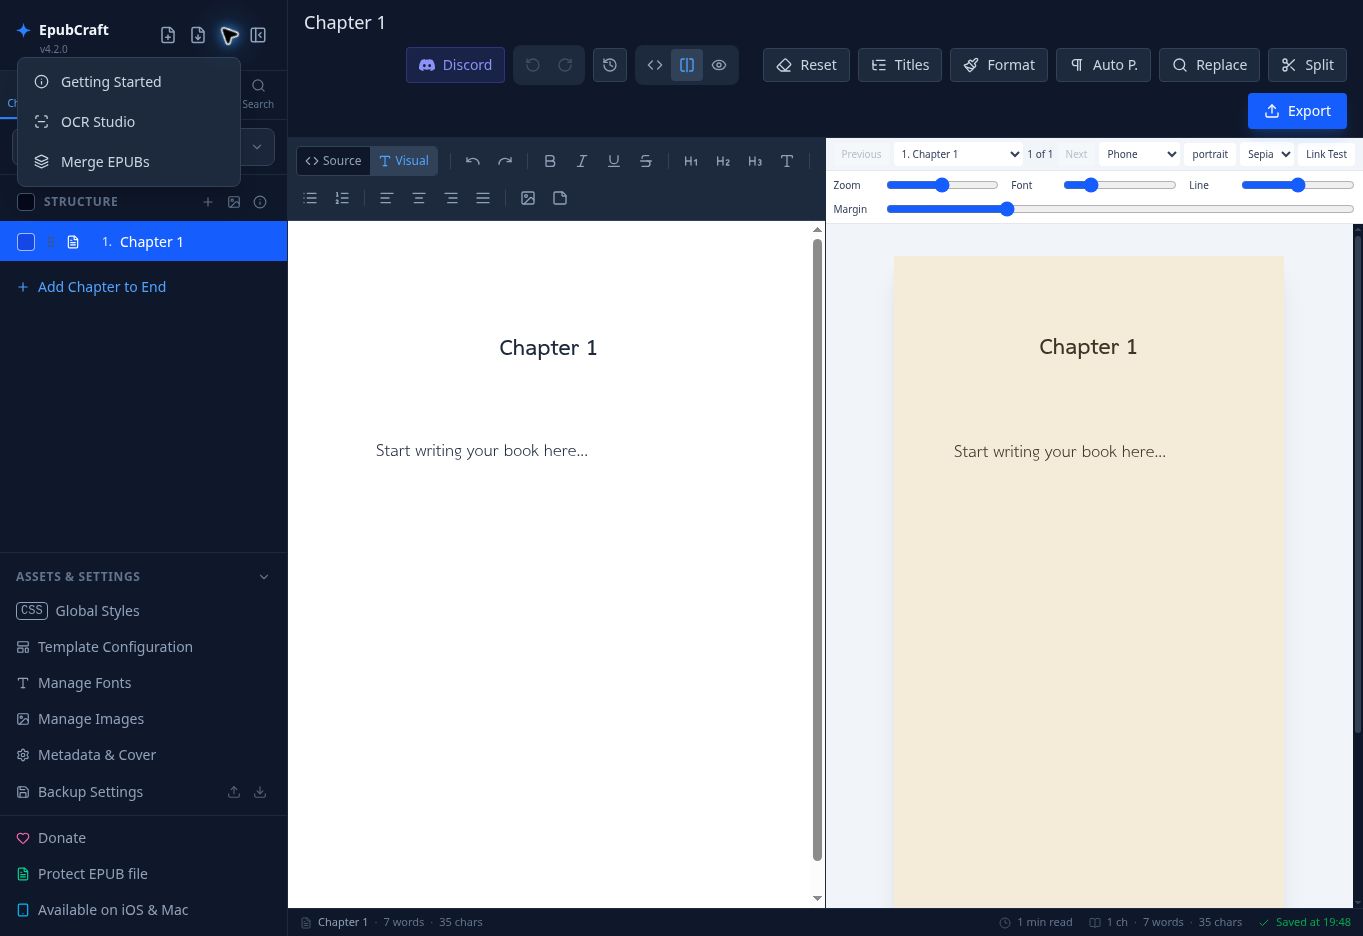
- Close Getting Started with × after reading it. Reopen it through the three-dot More tools → Getting Started menu. This checklist is a guide, not book content.
- Open More tools to find OCR Studio and Merge EPUBs. Close the menu when it obstructs the editor. The screenshot intentionally shows it open to identify its location.
- When a dialog has Save, use it after editing. Cancel discards edits in that dialog. Do not assume clicking outside saves changes; reopen the dialog to check if uncertain.
- On small screens, use the sidebar toggle if the navigation is hidden, and switch Code/Preview for more space. Read icon tooltips before using an unfamiliar command.
Section 4 / 18
Create, import and switch books
New eBook starts a blank book, Import loads a manuscript or exported backup, and Library selects existing books. Read your version’s confirmation prompt before New/Import because its effect on the active book may differ. Back up the active book first.
Import a file step by step
- Export the active book as Project ZIP and verify the download has completed. Then click Import beside New eBook.
- Choose the file on your device. Start with a single file. Select an EPUB or ZIP directly without extracting it first. An arbitrary ZIP that is not an EpubCraft project may not restore correctly.
- Wait for the chapter list to appear; do not click Import again while processing. Select the first and last chapters and compare their previews with the original.
- Open Metadata & Cover, Outline, Manage Images and Manage Fonts to inspect title, author, language, cover, navigation, images and fonts. Open Health before making bulk edits.
| File type | Checks after import |
|---|---|
| EPUB | Reading order and navigation are separate; inspect both Chapters and Outline, plus CSS, images and cover. |
| Project ZIP | Compare chapter count, text, images, fonts and metadata with the original. Do not assume a ZIP includes all history, notes or settings. |
| TXT / Markdown | Check paragraphs, language and headings. TXT has no rich formatting; you may need Split to divide a long import. |
| HTML / HTM / XHTML / DOCX | Use these when supported by your version’s file picker. Check headings, tables, lists, images and formatting after conversion; do not expect an exact Word layout. |
Library: switch without importing again
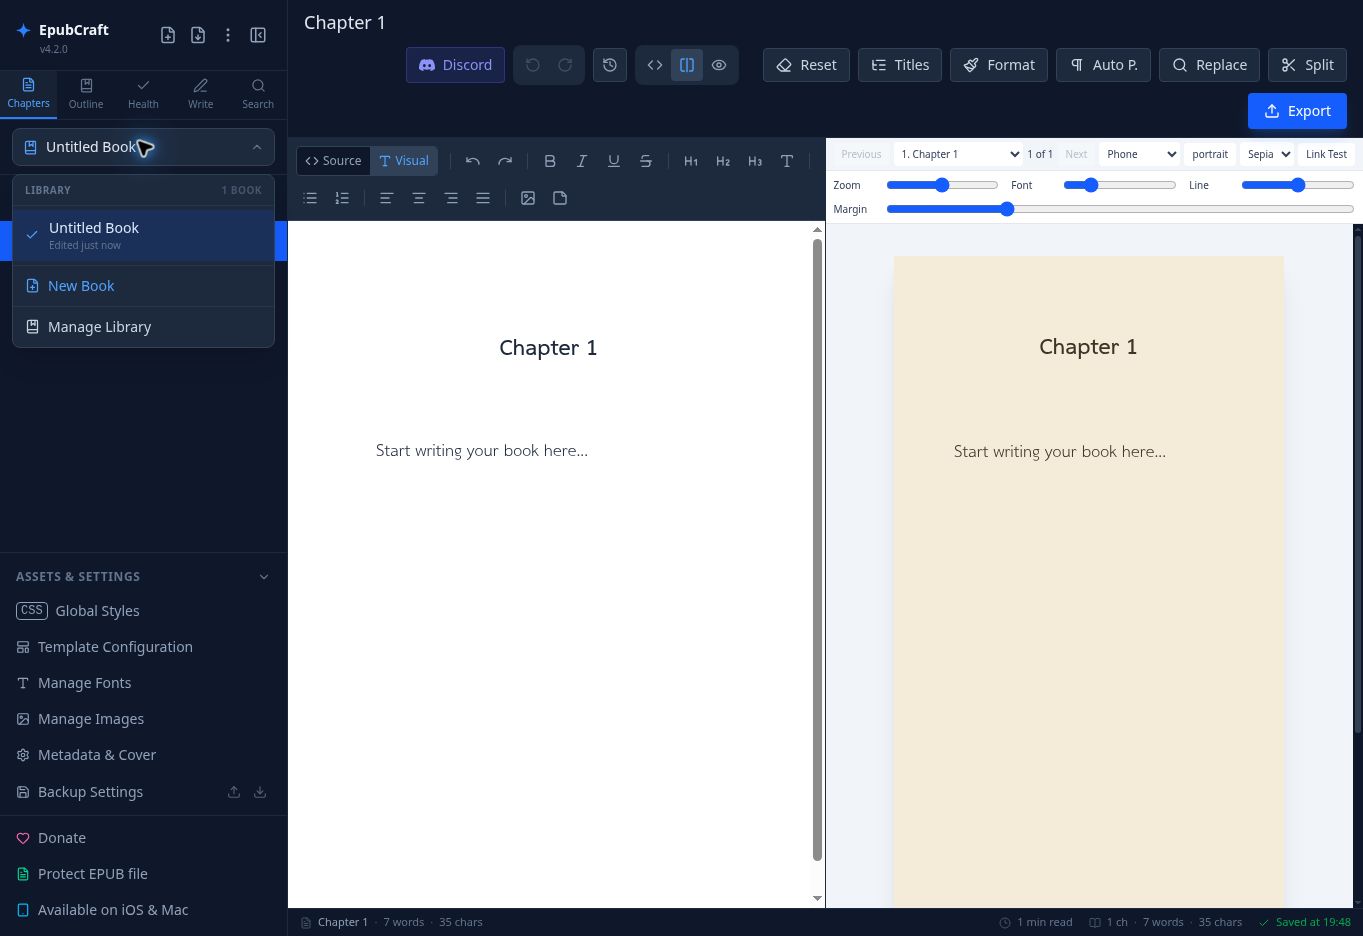
- Click the book name in the sidebar, such as Untitled Book. Select a book from the list, then check its title and first chapter before typing.
- New Book starts another book; Manage Library opens library management. Read any deletion prompt carefully. If titles are duplicated, inspect the contents and change Title in Metadata to distinguish them.
Section 5 / 18
Manage chapters, reading order and special pages
A chapter is a content unit, not necessarily a printed page. The Chapters list controls the main reading order, called the spine. Outline controls the navigation used to jump to content, so check both after reorganizing.
Practice adding, naming and ordering chapters
- Open Chapters, select the chapter to edit, and check Chapter Title above the editor. Change it, for example from Morning to Morning Walk. Switch away and back to confirm.
- Use Add Chapter to End to append a chapter, or the + / Insert Chapter Below control on a chapter to insert immediately after it. Select the new chapter, name it and add content. Resolve accidentally added empty chapters before exporting.
- Drag a chapter by its handle to the intended position. Read the list from top to bottom and test Previous/Next in Preview. Numbers in chapter titles or filenames are not a substitute for checking the actual order.
- Chapter checkboxes and Select all prepare a multi-chapter operation; clicking a title opens a chapter instead. Before a bulk command, inspect the selected chapters and clear the selection when finished.
The chapter title is not the on-page heading
Chapter Title labels the entry; an H1 heading belongs to the visible text. If the preview still shows an old heading after renaming, edit that heading separately. Regenerate Chapter Titles/Titles derives titles from content across chapters; back up and inspect every result. It is unnecessary for a single rename.
| Structure | When to use it and what to do next |
|---|---|
| Prepend Empty Chapter | Adds a blank chapter at the start for a preface or dedication. Name it, write its content, then set Matter/Semantic in Outline. |
| Prepend Cover Page | Set the cover in Metadata first. Use this when you need a cover page inside the content, checking that an imported EPUB does not already contain one. |
| Prepend Book Info | Complete metadata first, then generate the page and inspect its text. Recheck it after later metadata edits; do not assume it updates automatically. |
Section 6 / 18
Build a table of contents and classify content
TOC means Table of Contents: entries readers select to navigate. Building a TOC does not necessarily add a visible contents page to the text. Removing a TOC entry is not the same as deleting its chapter.
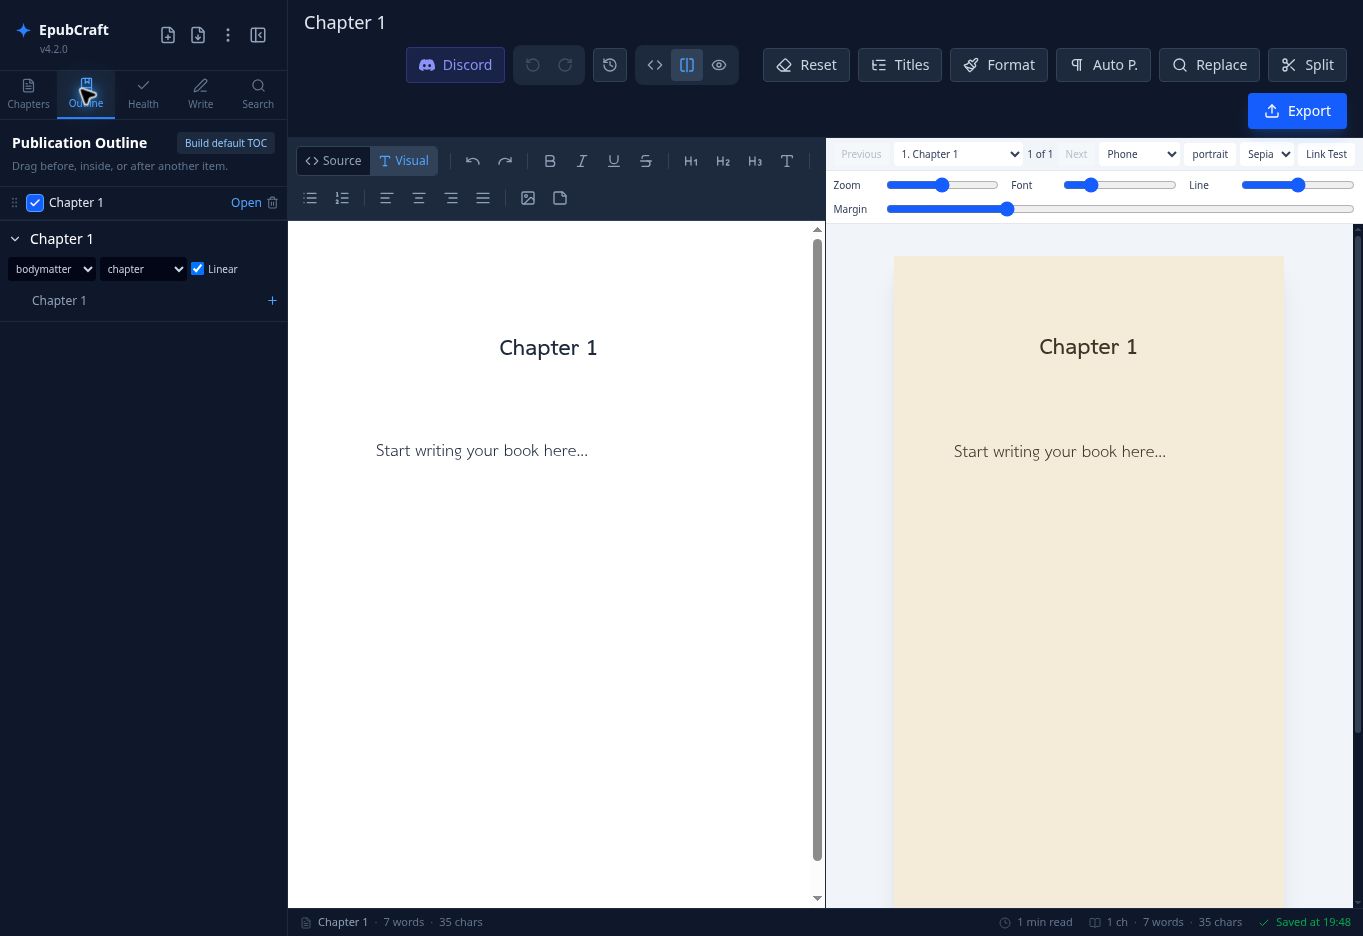
- Finish ordering Chapters, then open Outline. Use Build default TOC if navigation is empty. If you already customized it, back up before rebuilding because you may need to reconstruct that structure.
- Enable Include for chapters readers should find directly, such as Morning/Evening. A cover may not need a TOC entry, but important content should remain reachable.
- Use Open or select an entry to check its destination. Where Up/Down or Indent/Outdent controls are available, use them for order and nesting, such as Part → Chapter. Do not nest entries just for visual indentation.
- For within-chapter navigation, create H2/H3 headings in the editor first, then use the heading-to-TOC option in Outline. Check that navigation reaches the heading, not merely the chapter start.
- Set Matter and Semantic to match the content, then test the table of contents in the exported EPUB. Seeing entries in the editor alone does not verify the exported links.
| Setting | Meaning and example |
|---|---|
| frontmatter / bodymatter / backmatter | Front section / main text / end section: a preface uses frontmatter, Morning uses bodymatter, and an appendix uses backmatter. |
| Semantic | The content’s specific role: cover, titlepage, copyright-page, dedication, foreword/preface, part, or chapter. |
| End-section semantics | appendix, notes, bibliography, index, glossary, acknowledgments, and colophon (production details). Choose the role that actually describes the content. |
| Linear | Includes content in the continuous reading sequence. Beginners should keep it enabled for main chapters. Disabling it may make some readers skip that content on Next; it is not a privacy control. |
Section 7 / 18
Write and format in Visual / Source
Use Visual for everyday writing and Source to inspect HTML, the tags that describe structure: <h1> for a heading and <p> for a paragraph. Both modes edit the same chapter, not separate copies. Back up before making unfamiliar Source changes.
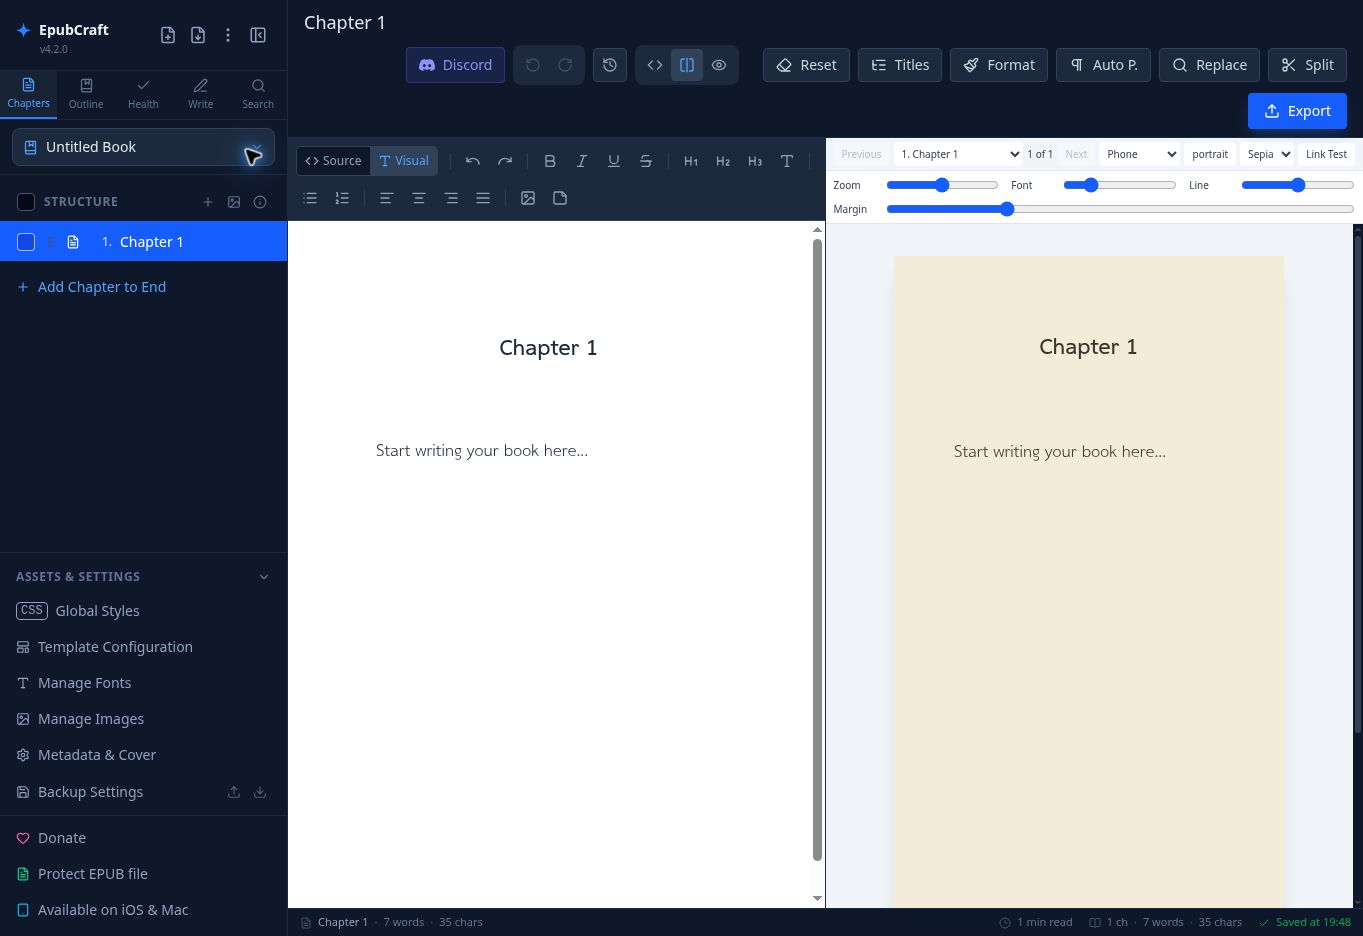
Apply one formatting change at a time
- Select a chapter, choose Visual, and place the cursor or select the words to format. Do not select the whole chapter when only one word needs bold.
- Select garden and click Bold. Click elsewhere to inspect the result, then try Undo and Redo to learn recovery before using them on real work.
- Apply H1 to the chapter heading, H2 to sections within it, and H3 to subsections. Use Paragraph for body text; do not use H1 merely to make text bigger.
- For a list, put each item on its own line, select the text and use Bulleted List or Numbered List. Check that items are separate. If subsequent text is still a list, toggle the list control off.
| Tool | How to use / what to check |
|---|---|
| Italic / Underline / Strike | Select words and apply italic, underline or strikethrough. Check that formatting does not unintentionally continue into the following text. |
| Align | Select a paragraph and choose left, center, right or justified alignment. Center can suit headings; inspect spacing in long body text, especially with Justify. |
| Font Size / Word Wrap | A text-formatting size control may add a style to content, while editor display size and Word Wrap are workspace preferences. Use the tooltip and Preview to distinguish them. |
| Find & Replace | Search or replace in the active chapter. For the whole book, use the Search tab in section 13. Check scope before replacing. |
| Split at selection | Back up, place the cursor at the intended new-chapter boundary, and split. With Split + first line heading, inspect the first line used as the title and the content on both sides of the boundary. |
Insert an image and a footnote
- Image: place the cursor at the intended paragraph, click Insert Image, choose or upload a file, and enter meaningful alternative text, such as “A path through a flower garden.” Confirm and check its placement. See section 09 for asset management.
- Footnote: place the cursor after the term, click Insert Footnote, enter a note such as “A practice example,” and confirm Insert Footnote. Inspect the reference, then test the link and return path in the exported book. Popup behavior depends on the reader.
Source: a small readable example
<h1>Morning</h1>
<p>The <strong>garden</strong> wakes in the morning.</p>
Opening and closing tags surround content: h1 is a heading, p a paragraph, and strong emphasizes a word. Do not paste this code into Visual, where it may appear as literal text. Try it in a practice chapter’s Source, then switch to Visual to inspect the result.
Manuscript-changing tools: back up first
| Command | Use and risk |
|---|---|
| Format | Select a chapter and use Format to make HTML easier to read. Check that text and paragraphs were not unintentionally changed. This is not automatic proofreading. |
| Auto Paragraph / Auto P. | Use for raw text needing paragraphs. Test one chapter and inspect dialogue or verse. Do not repeatedly apply it to already structured content without checking. |
| Regenerate Chapter Titles / Titles | Derives titles from headings/content. Inspect all titles and navigation afterwards, especially chapters without headings. |
| Reset Styles / Reset | Read the confirmation for its exact scope; it may affect classes, inline styles, global CSS and fonts. Do not treat it as a generic repair button. Save a ZIP and the original CSS first. |
Section 8 / 18
Inspect the book with Preview
Preview helps inspect edits, but it is not every EPUB reader. Use it to catch overflowing headings, oversized images, unreadable colors and broken links, then test the actual export. Font/Line/Margin simulate reading preferences; they do not set the book’s global CSS.
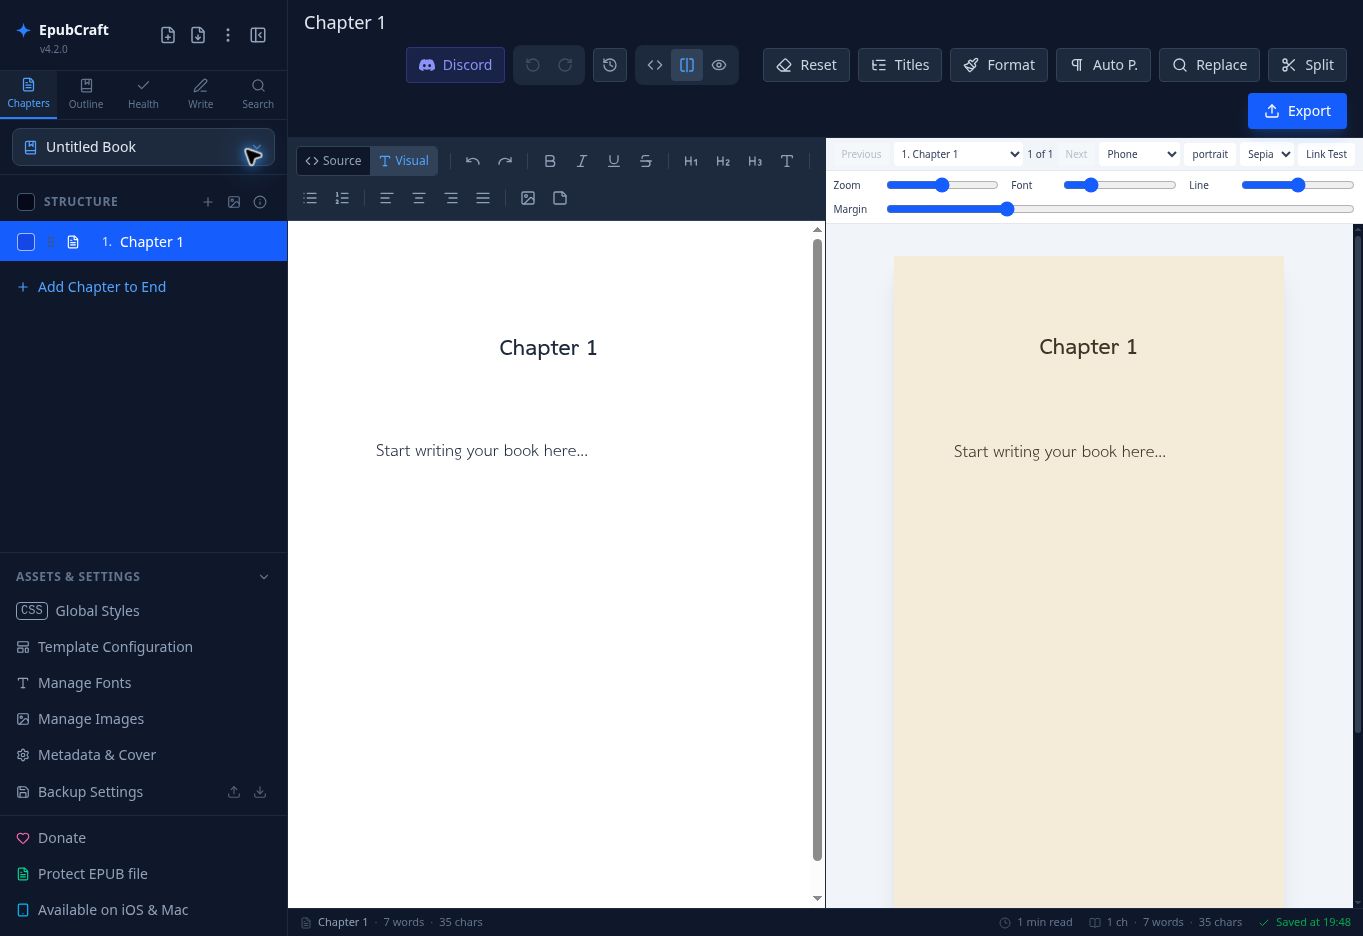
- Open Split or Preview, choose Morning from the chapter selector, and use Previous/Next to confirm the transition to Evening.
- Switch Phone to Tablet, then try Small e-ink, Large e-ink or Desktop as relevant. Toggle Portrait/Landscape where available. Check that reflow does not hide content.
- Try Light → Sepia → Dark. Inspect images with white backgrounds, text colors and links. Repeat this check after customizing CSS colors.
- Increase Font and Line to simulate larger-text reading, vary Margin, and inspect headings, lists and images. Zoom magnifies the viewing area; it does not change manuscript text size.
- Enable Link Test and try internal links, footnotes and return links. Inspect external URLs before opening them. Return to normal reading mode when finished.
Section 9 / 18
Styles, templates, fonts and images
Open Chapters → Assets & Settings for these four tools. CSS is a set of shared appearance rules, such as paragraph spacing and heading size. Assets are supporting files such as images and fonts. Uploading an asset does not automatically place or use it in the content.
Global Styles: make controlled book-wide changes
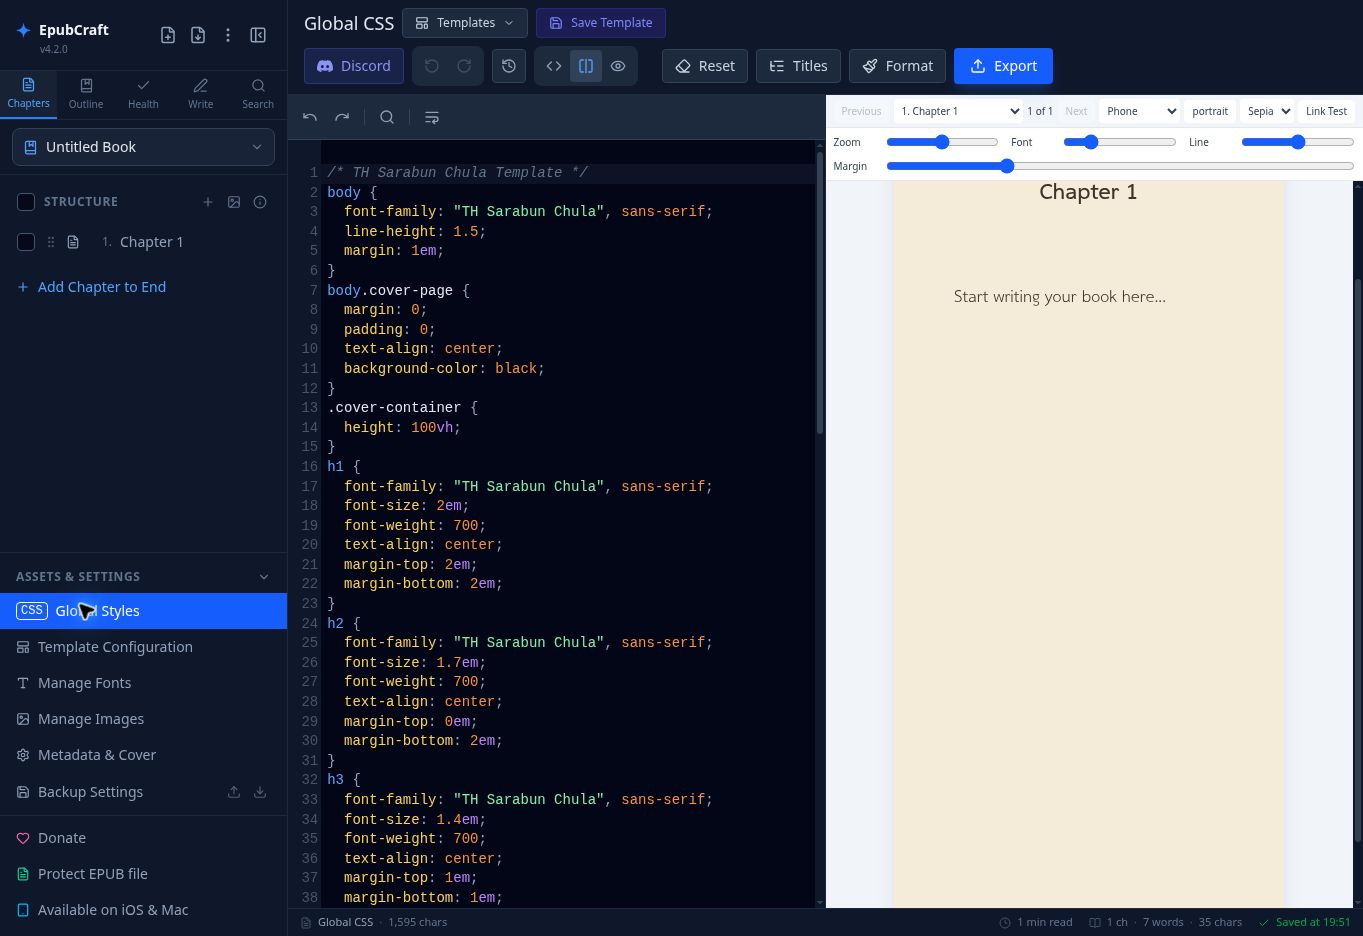
- Create a checkpoint and ZIP, open Global Styles, and copy the existing CSS before editing. Change one rule at a time, such as body line spacing, and inspect at least two chapters.
- The example below keeps images within the page while retaining their proportions. If an img rule already exists, edit it rather than adding conflicting duplicates; later rules may override earlier ones.
- Click a chapter in Chapters to resume writing. If appearance does not change, check the selector and possible inline overrides. Do not delete all CSS as a troubleshooting experiment.
img {
  max-width: 100%;
  height: auto;
}
Templates: apply a preset and keep your own
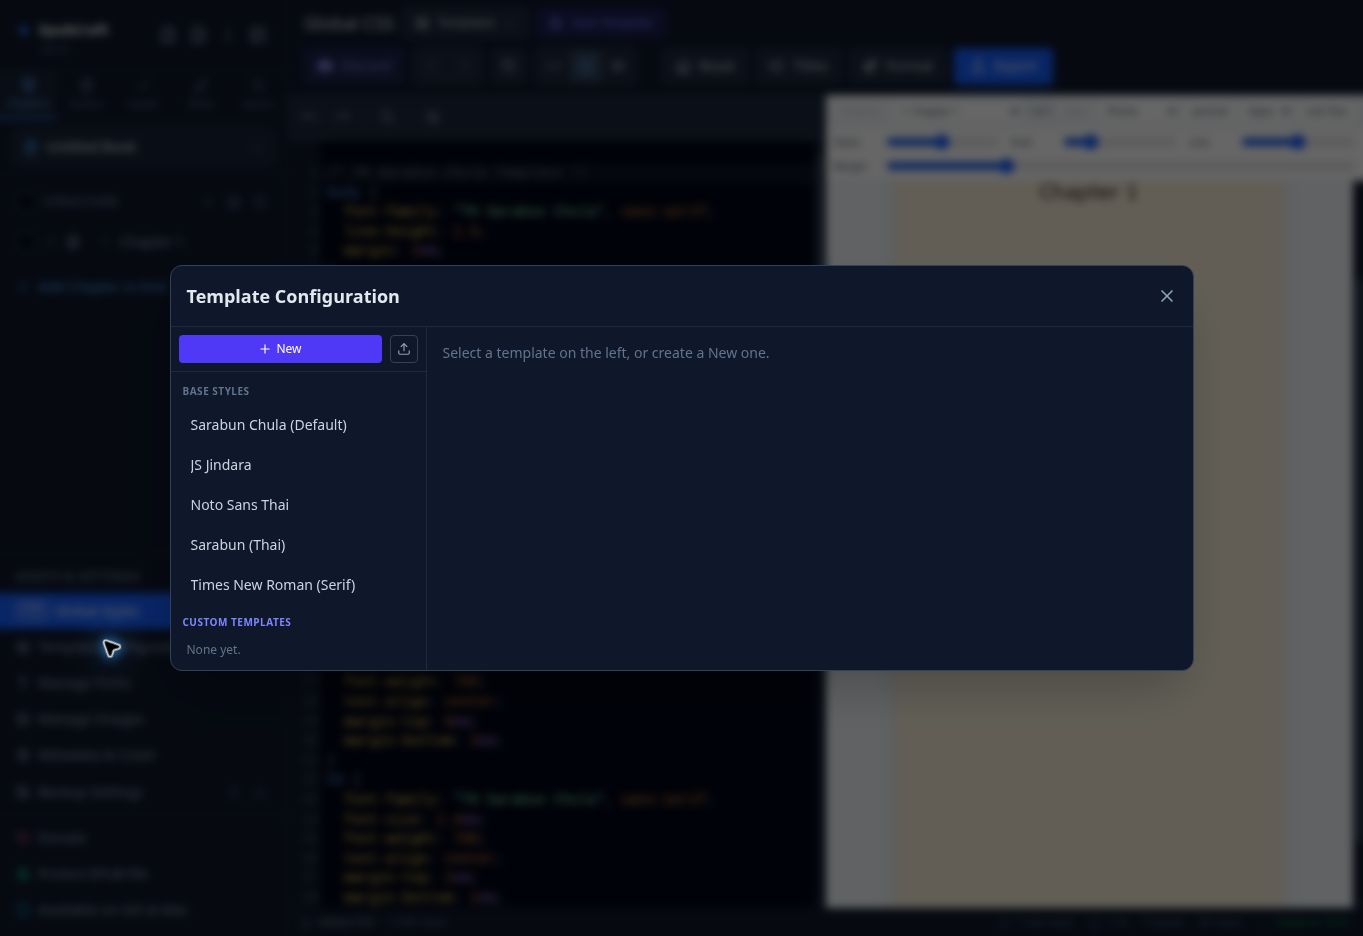
- To change the base style, open Global Styles and use CSS Templates. Choose from the presets available in your version, such as Sarabun Chula, JS Jindara, Noto Sans Thai, Sarabun or Times New Roman. Back up CSS because applying a preset can replace it.
- Template Configuration manages presets. Select an entry to inspect it, choose New for your own template, or Import a template to load a template file. This is separate from importing a book.
- Use Save Template in CSS mode to preserve the current style. Choose a recognizable name such as Practice-wide-spacing, then back up templates through Backup Settings. After applying a font-dependent template, check Font Manager for the required files.
Fonts: upload and actually use a font
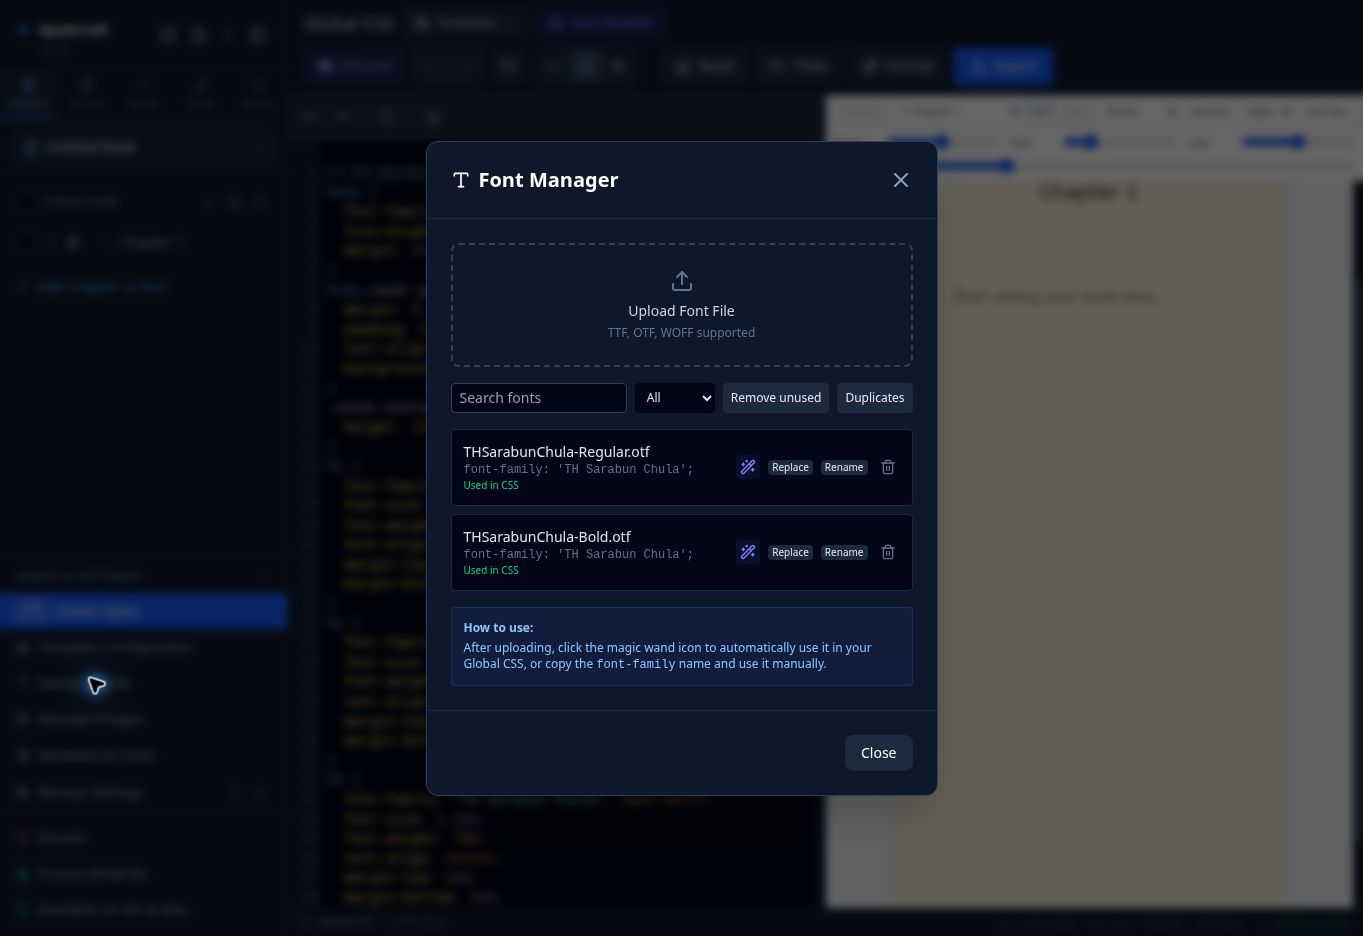
- Open Manage Fonts, use the upload area and choose a font licensed for ebook embedding, such as TTF/OTF/WOFF/WOFF2 as accepted by the picker. Wait for its entry to appear.
- Use Use this font in CSS / the magic-wand control, or copy the displayed font-family into global CSS. Do not guess the family name from a word processor. Inspect both regular and bold text.
- Search fonts finds names; All/Used/Unused filter entries; Rename makes an entry identifiable; Replace, where available, changes its file. Recheck CSS and Preview after renaming or replacing.
Images: distinguish asset management from placement
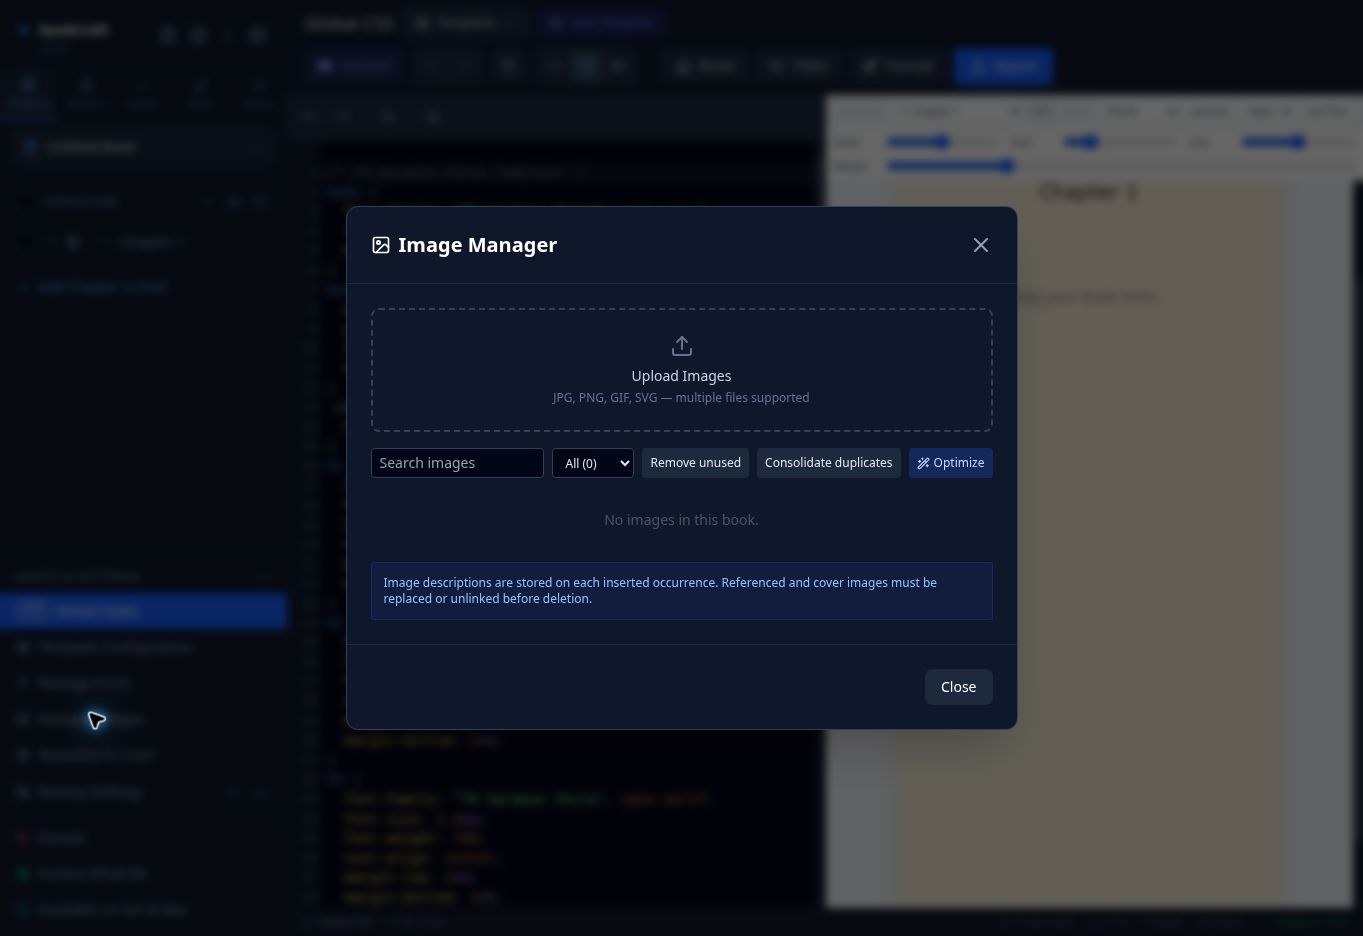
Start with JPG for photographs or PNG for sharp-edged graphics/transparency. GIF, SVG and WebP may also be accepted depending on the version, but readers can display them differently, especially animation and vector content. Check the upload picker’s accepted types and test the actual export.
- Open Manage Images and upload a JPG/PNG to begin. Use Search images and All/Used/Unused/Cover to find files. The screenshot below is empty and does not show a completed upload.
- Return to the editor, place the cursor and use Insert Image to place an image in a chapter. Write meaningful alt text, not just a filename such as IMG_001. Set the cover separately in Metadata & Cover.
- Optimize reduces image size. Keep originals first and inspect fine detail afterwards, especially lettering in images. Do not make text unreadable just to shrink the file.
Section 10 / 18
Enter metadata and set a cover
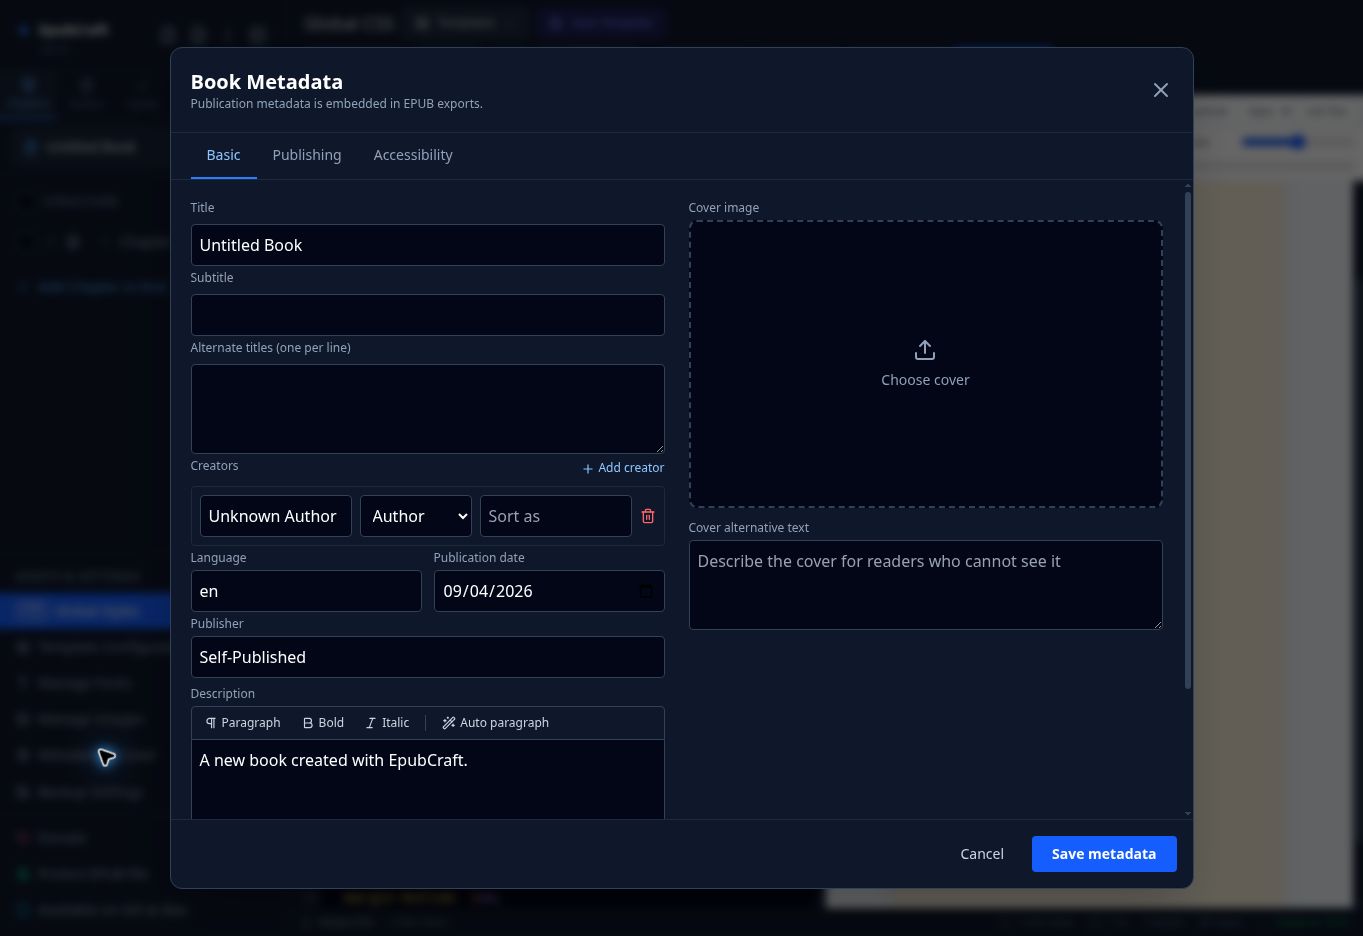
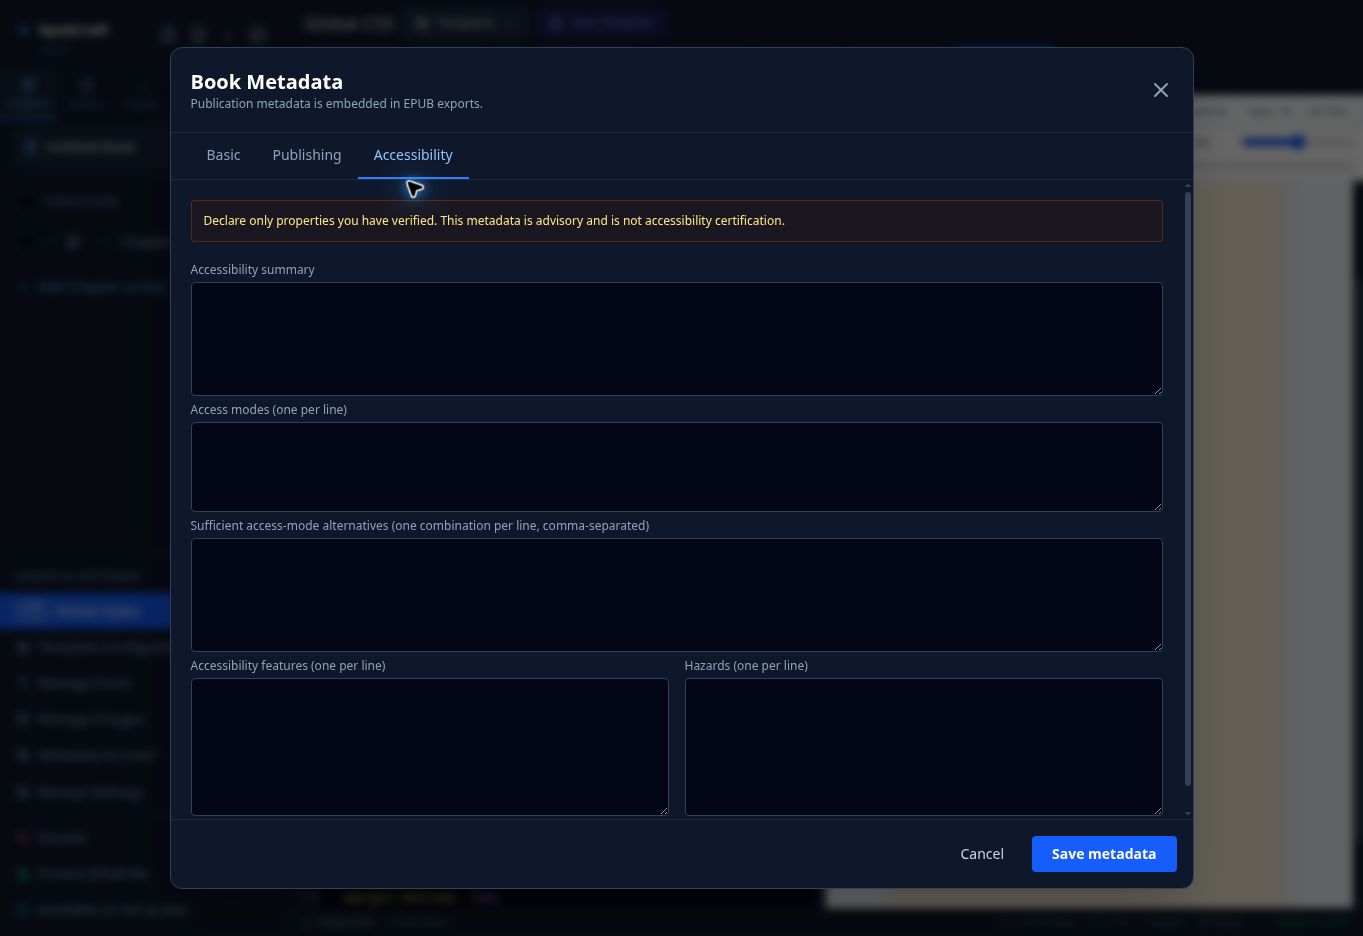
Metadata describes the book for reading apps: title, author, language and other details. It is separate from text printed inside a chapter. Open Chapters → Assets & Settings → Metadata & Cover; the three tabs are Basic, Publishing and Accessibility.
Basic: enter reader-facing information
- Replace Untitled Book with the actual Title, such as My First Book. Leave Subtitle and Alternate titles empty if not applicable; do not invent data to fill every field.
- Replace Unknown Author with the author’s name and set Role to Author. Use Add creator for additional people and assign their actual roles, such as Editor or Translator.
- Set Language to the main content language, such as th for Thai or en for English. Write a synopsis in Description rather than pasting the entire first chapter.
- Choose a Cover image from your device and write cover alternative text conveying the title and relevant visual meaning. Click Save metadata, then reopen the dialog to verify the values and image.
| Field | Explanation and example |
|---|---|
| Subtitle / Alternate titles | A subtitle and alternative names for the book. Use one alternative per line; these are not chapter titles. |
| Role / Sort as | Role identifies Author, Editor, Translator, Illustrator, Contributor or Publisher. Sort as controls ordering, for example Austen, Jane; it does not rename the cover text. |
| Publication date / Publisher | The publication date and publisher. Use accurate details; self-publishers can use their own publishing name as appropriate. |
| Description formatting | Paragraph/Bold/Italic format the synopsis. Auto paragraph helps divide raw text into paragraphs. Check before saving; these controls do not format the whole manuscript. |
| Cover / Cover page | Metadata Cover identifies the book’s cover image; Prepend Cover Page creates a content page. Setting an image alone does not confirm a cover chapter exists. Avoid duplicate cover pages. |
Publishing: identifiers and edition details
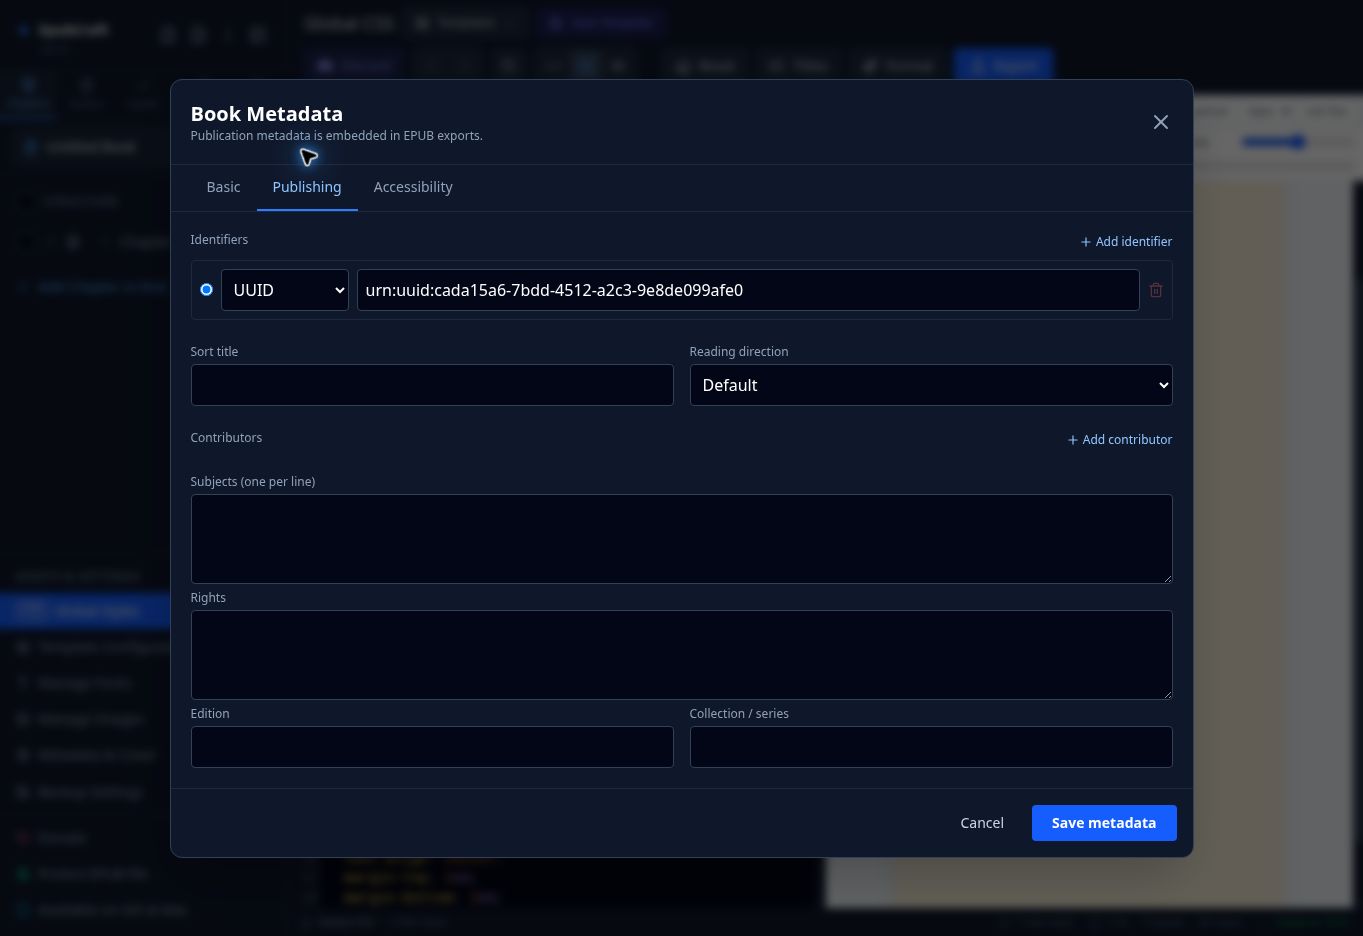
Sort title controls ordering; for example, Garden, The can sort The Garden under Garden without changing the displayed Title. Leave it empty if you do not need custom sorting.
- Open Publishing and inspect existing identifiers. Select one Primary identifier. For practice, keep the generated UUID if you have no ISBN; do not make up an ISBN.
- Use Add identifier for a real additional identifier, choose its correct scheme (ISBN, DOI, URI or OTHER), and enter the actual value. Editing a title does not necessarily require a new identifier every time.
- For ordinary Thai/English text use Default or Left to right as appropriate. Right to left is not a right-alignment tool; paragraph alignment belongs in the editor/CSS.
- Fill Contributors, Subjects, Rights, Edition and Collection/Series only where relevant. Subjects describe topics, Rights states rights information, Edition identifies the edition, and Series groups books, such as Garden Stories, number 1. Follow each field’s format, then save metadata.
Accessibility: declare only verified properties
Accessibility metadata helps users of assistive technology understand a book’s capabilities and limits. Start with a plain-language summary, for example: “The content is text; illustrations have descriptions, but the book has not yet been tested with a screen reader.” Use that statement only if true. A clean Health panel does not prove full accessibility.
| Field | How to approach it |
|---|---|
| Access modes | How information is perceived, such as textual or visual. Inspect the book and use accepted terms rather than listing every option. |
| Sufficient access-mode alternatives | Combinations sufficient to understand the content: one combination per line, with components comma-separated. Do not guess if you have not assessed this. |
| Features / Hazards | Features are implemented accessibility aids, such as structural navigation or text alternatives. Hazards describe assessed risks, such as flashing. Follow the field’s vocabulary; do not declare none without checking. |
Section 11 / 18
Read and resolve Book Health issues
Health is an automated checklist, not proofreading or EPUB/accessibility certification. Prioritize Errors; read Warnings and decide how they apply. Do not ignore everything just to make the panel look clean.
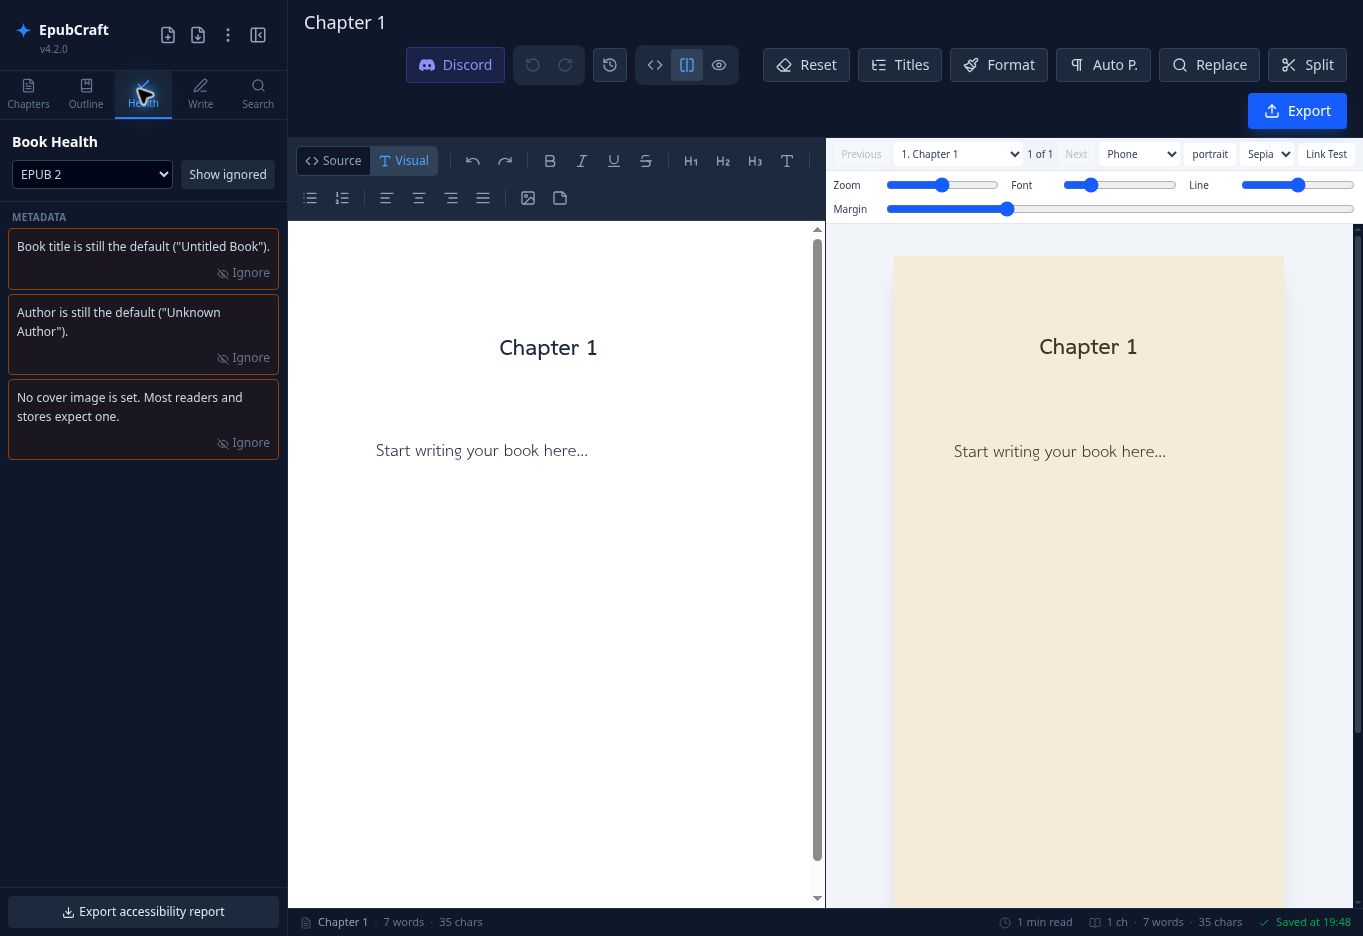
- Open Health, set EPUB target to the intended export, and read the full message and affected chapter or asset.
- For a default-title issue, open Metadata & Cover → Basic, edit Title/Creator and save. Return to Health to check the result. Do not change Chapter Title instead of the book title.
- For an image/link issue, open the named chapter, inspect the asset in Manage Images or the link target in Source/Preview, and fix the cause. Do not remove important content just to silence a warning.
- Use Ignore only when you have read the issue and have a reason not to act. Review Show ignored before export: hiding an item does not fix it.
- Use Export accessibility report to keep or share a report. Read it alongside manual checks, such as whether alt text is meaningful and navigation reaches the correct content.
Section 12 / 18
Writing mode, goals and private notes
Open Write to track writing. Goals measure progress; they do not generate text or stop your manuscript at a limit. Goals and Private Notes are not intended as reader-facing pages, and “private” does not mean encrypted or guaranteed confidential.
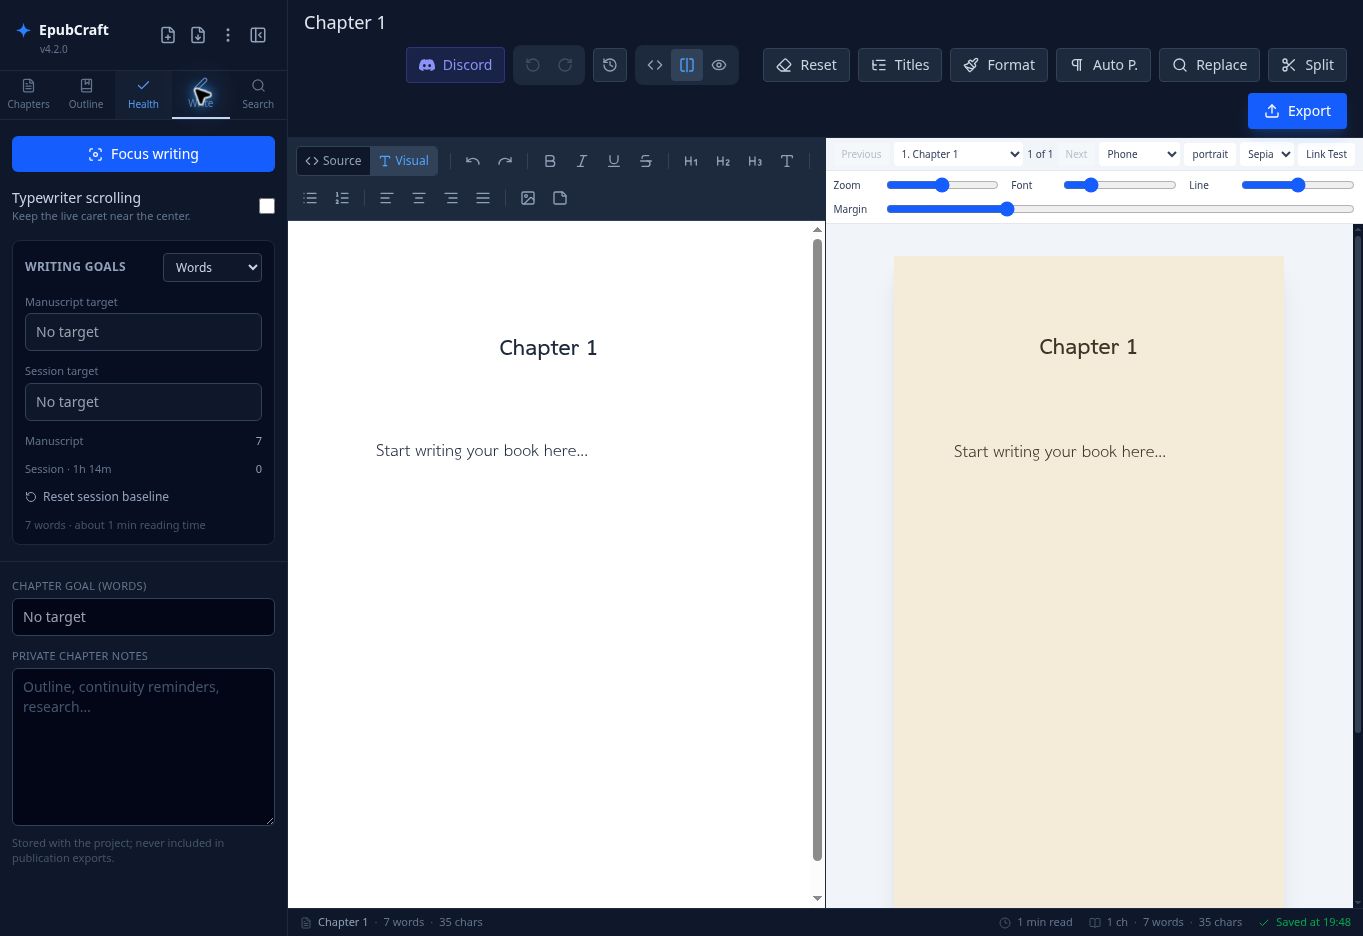
- Select the chapter first, then open Write. Try Focus writing to reduce distractions. Turn Focus off to return to the normal workspace when you need other menus.
- Enable Typewriter scrolling to keep the typing position near the screen center. Try several lines; turn it off if the motion distracts you. This setting does not change the EPUB.
- Choose Words or Characters. For Thai, Characters may be easier to compare because word counts depend on segmentation. Keep the same metric when tracking progress.
- Practice example: choose Characters and set Manuscript target to 2000, Session target to 200 and Chapter goal to 1000. These are optional exercise targets, not EPUB requirements.
- Use Reset session baseline when starting a new writing session, then add text. Observe progress relative to the new baseline; this does not delete content or reset the manuscript’s total length.
- Write a private chapter note such as “Explain why the character leaves the garden.” Switch chapters to check which chapter owns the note. Put reader-facing information in the editor or a footnote, not in private notes.
Section 13 / 18
Search, replace and split safely
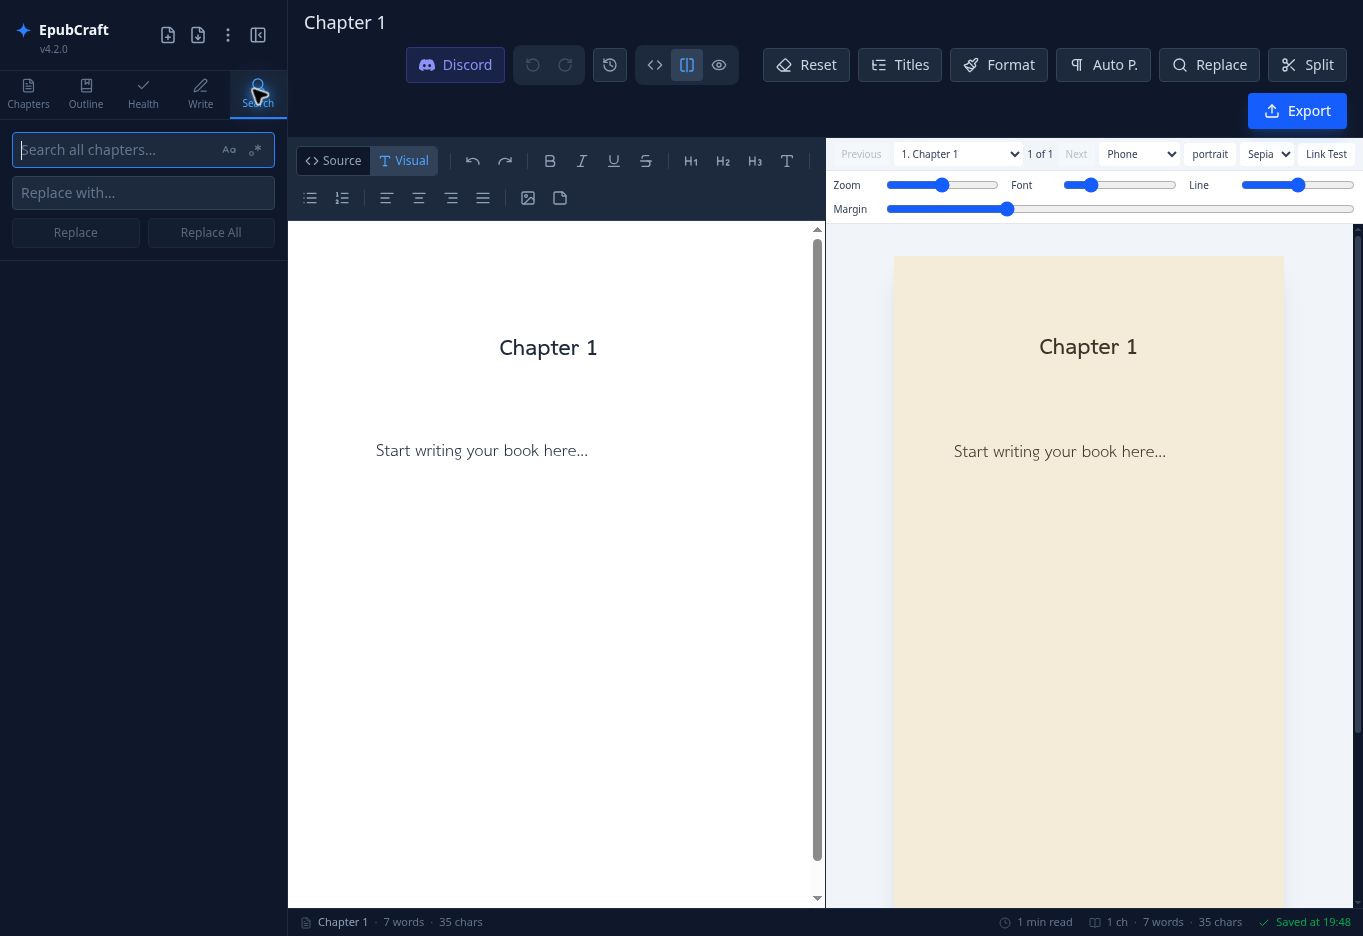
Start with plain-text search. Regex (regular expression) describes a pattern, such as a chapter marker, rather than just a literal word; it may also match HTML tags. Scope defines what changes: Current Chapter means the active chapter; All Chapters means the whole book. Create a ZIP and checkpoint before bulk operations.
Search: replace one occurrence before the whole book
- Open Search, enter garden, and leave Regular expression off for literal text. Enable Match case only if Garden and garden should differ.
- Select a result and read nearby text to confirm the chapter and context. If nothing matches, check spelling, spaces and Match case first.
- Set Replace with to park, replace one occurrence, inspect the sentence in Preview, and undo if needed. Use Replace All only when every match should change. Check names that may also occur inside longer words.
RegEx Replace: an input-to-output example
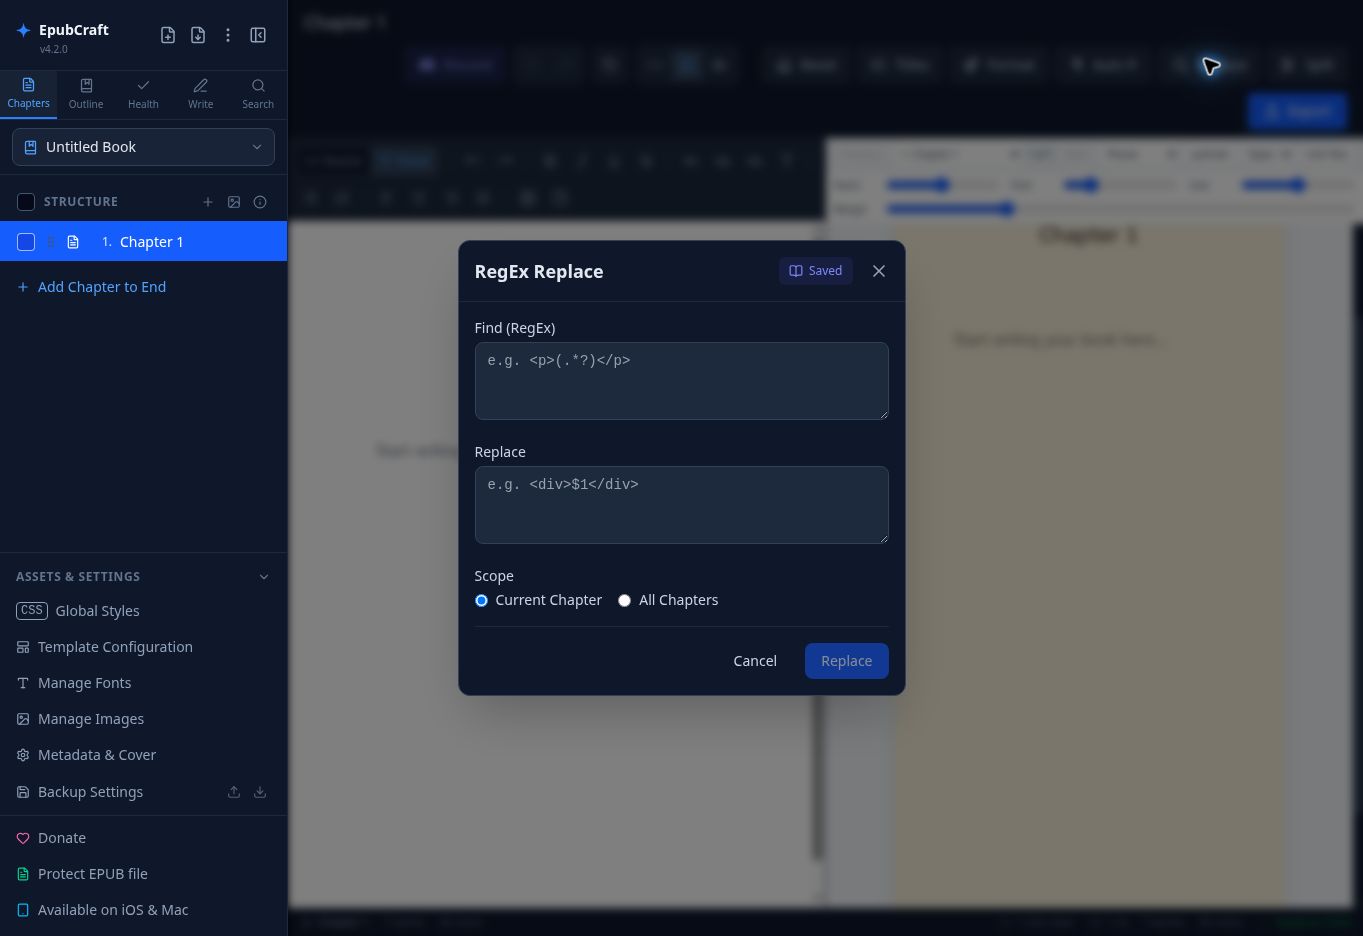
Use a practice chapter in Source. This example turns paragraph-style chapter labels into H1 headings; it is not a universal HTML regex. Attributes, spacing and nested tags can change matches. Work from the actual structure you see.
<p>Chapter 1</p>
<p>The garden wakes.</p>

Find:    <p>(Chapter [0-9]+)</p>
Replace: <h1>$1</h1>

Result:
<h1>Chapter 1</h1>
<p>The garden wakes.</p>- Back up, then open RegEx Replace / Replace from the toolbar in Source. Enter only the text after Find: and Replace: in the corresponding fields; do not include those labels.
- Choose Current Chapter. Parentheses capture Chapter 1; $1 reinserts that capture. [0-9]+ means one or more digits. Do not add surrounding / delimiters.
- Click Replace once. In Source, confirm that only the label became h1 while body paragraphs remain p; then inspect Preview and Health. If incorrect, recover before revising the pattern. Do not broaden to All Chapters as a test.
- Saved recalls stored patterns. Name reusable patterns by purpose, such as Paragraph chapter label to H1, and back up Saved RegEx through Backup Settings. A saved pattern is not automatically safe for every book.
Split Chapter: divide at explicit boundaries
This splitting exercise is separate from the replacement above. Use a fresh practice chapter and enter the HTML below in Source. Its pattern expects p tags; do not run the H1 replacement first and then reuse the p pattern unchanged.
<p>Chapter 1</p>
<p>The garden wakes.</p>
<p>Chapter 2</p>
<p>The garden rests.</p>- Create a ZIP/checkpoint and open Split Chapter from the toolbar. If unavailable, switch to Source. Enter
<p>(Chapter [0-9]+)</p>as the pattern. - Choose Current Chapter and enable Convert matched tag to <h1> to turn the matched labels into headings. The capture supplies Chapter 1 / Chapter 2 as titles. Click Split once and wait.
- Check that Chapter 1 and Chapter 2 content is separated in order, with no misplaced text or lost opening content. Inspect any empty chapter or text preceding the first match individually, then recheck Outline.
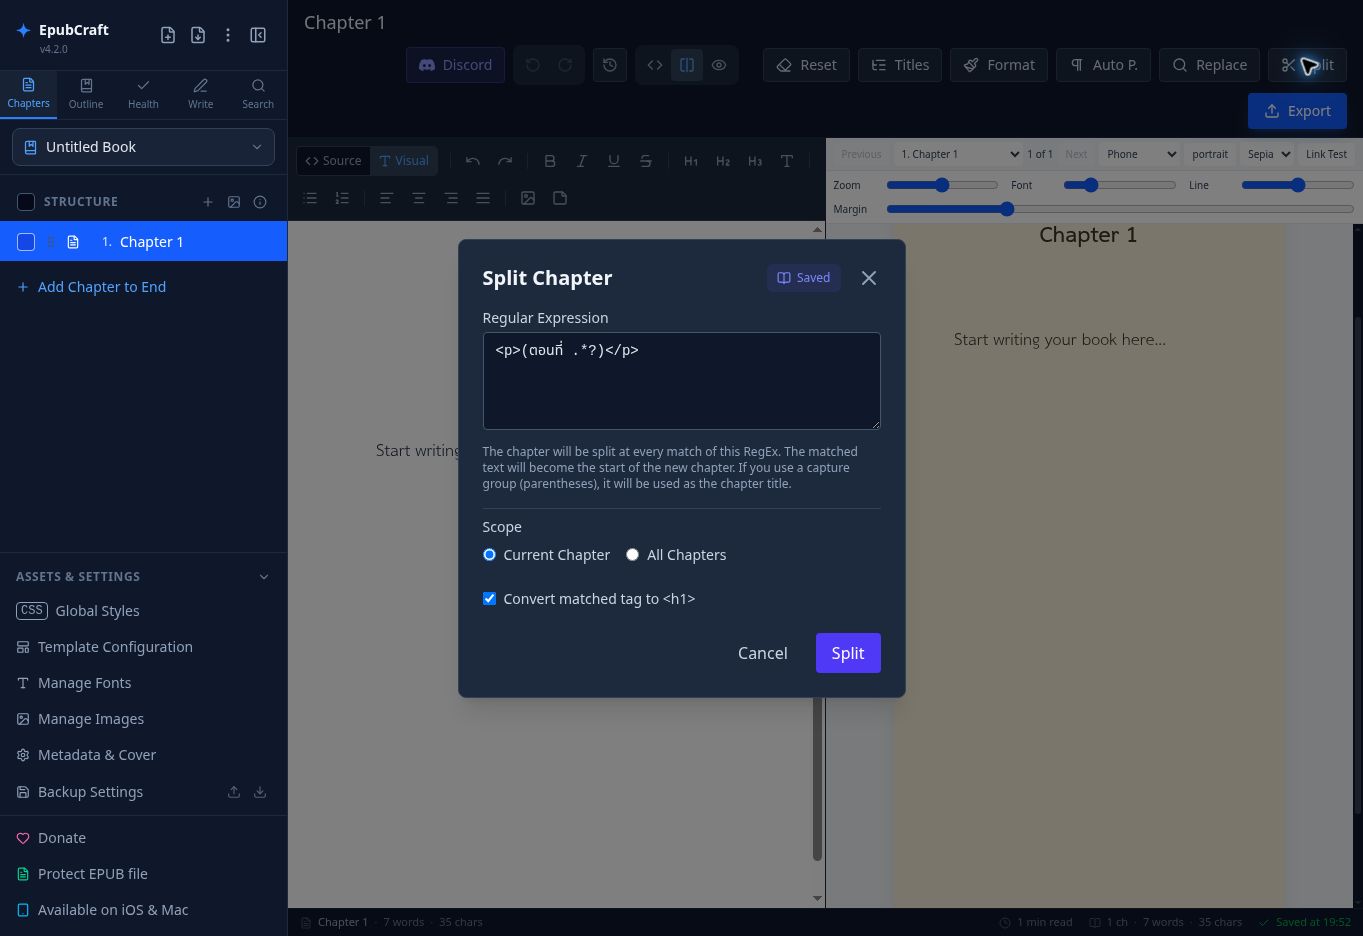
<p>(ตอนที่ .*?)</p> matches <p>ตอนที่ 1 บทนำ</p>. The .*? part matches the shortest text that lets the pattern succeed. Do not blindly broaden it when the actual markup differs.Section 14 / 18
Checkpoints, backups and recovery
Distinguish the recovery tools: Undo/Redo handles recent edits; History offers saved states inside the app; Project ZIP is a downloaded portable file; Backup Settings stores regex/template settings. Having one does not imply you have all the others.
| Tool | Use it for | Limit |
|---|---|---|
| Undo / Redo | Recent text/formatting edits | Check the control’s scope; do not assume it reverses an import or all asset deletions. |
| Revision History / Checkpoint | Recording and reviewing states before risky work | Still part of the app environment, not an off-device backup. |
| Project ZIP | Keeping a project file or moving devices | Test recovery of required content/assets; do not assume all history, notes or settings survive. |
| Backup Settings | Moving Saved RegEx and Templates | Not a manuscript backup. |
Create a checkpoint and recover safely
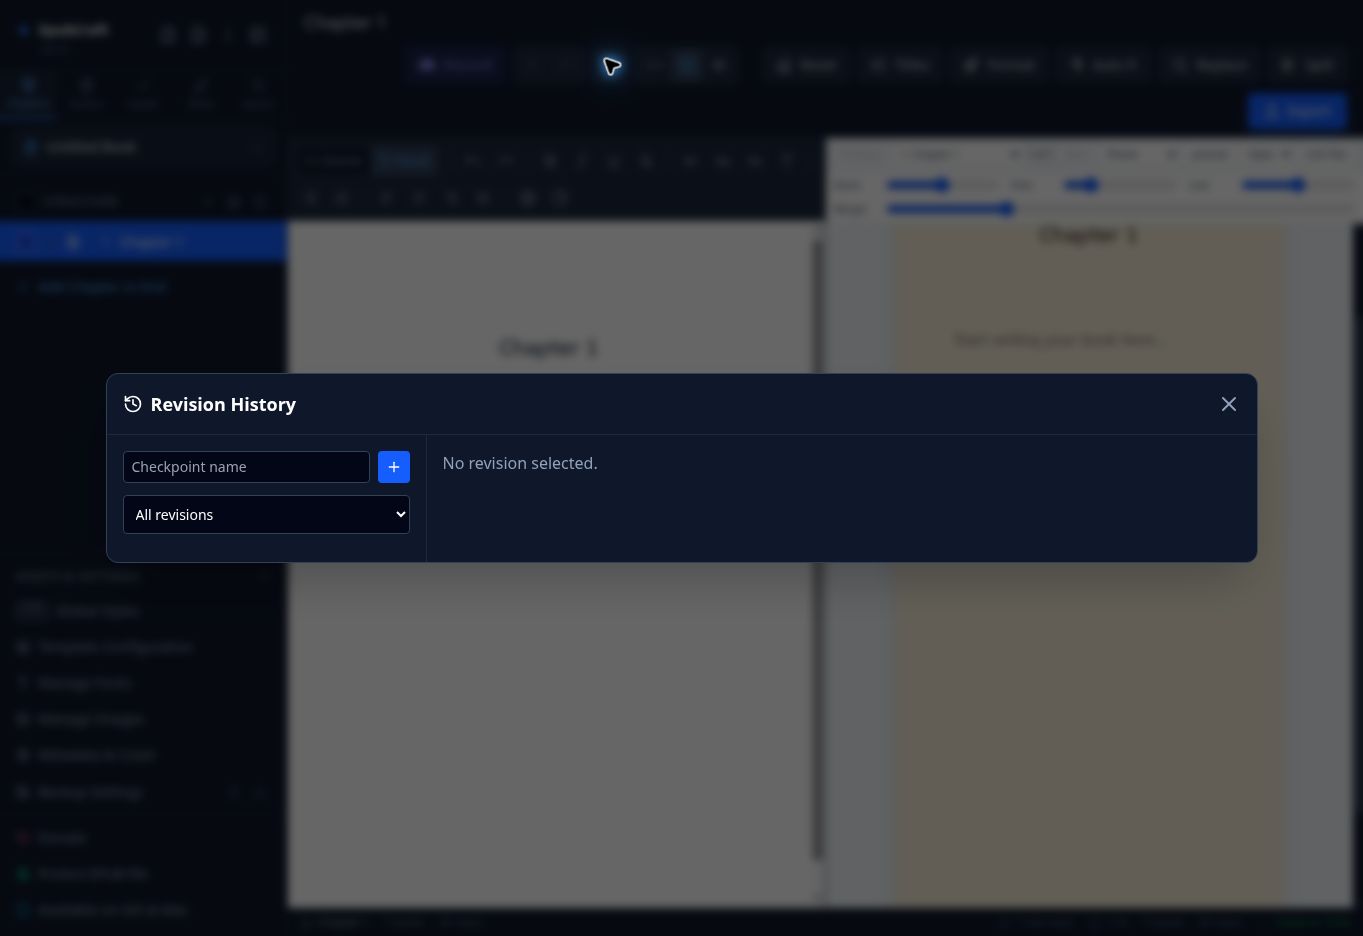
- Open Revision history from the toolbar, enter a descriptive name such as
Before split — 2026-09-05, and click Create checkpoint. Verify the new entry and timestamp. - Before restoring, save the current state as ZIP if it contains anything you may need. Open History, filter All/Manual/Automatic, and select an entry from before the problem.
- Inspect the selected state, use the Restore action offered for it, and read the confirmation. If the required revision is absent, do not choose at random; use a verified ZIP.
- After restoration, inspect the book title, chapter count, text around the affected area, images, CSS and metadata. Reopen Health. History does not replace checking the recovered work.
Create a recoverable ZIP, not just a download
- Choose Export → Project ZIP. If Chapter format is offered, choose HTML to preserve formatting. Plain Text/TXT strips markup and should not be the only backup of a styled book.
- Click Export Now and wait for completion. Keep a dated copy in your work folder, such as MyFirstBook-2026-09-05.zip. Keep another copy elsewhere before switching devices or clearing site data.
- Test importing the ZIP in a disposable workspace, such as a separate browser profile without important work, or after backing up the active book. Compare both chapters, images, fonts, cover, navigation and metadata with the original.
- Keep important notes, goals or settings separately if the restore test does not bring them back. An untested download may not be sufficient for a real migration.
Backup Settings: transfer reusable settings
In Assets & Settings → Backup Settings, use Export (up arrow; verify its tooltip) to save Saved RegEx and Templates. On the destination, use Import (down arrow) and choose that settings file, then inspect the restored entries. Back up the destination’s settings first in case names collide or values are replaced.
Section 15 / 18
OCR / Scan — reserved for a future update
As scoped for this manual, OCR Studio and Scan Studio do not yet have operational instructions or real screenshots. Do not use this section as a click-by-click guide. OCR converts lettering in images into text; scanning captures page images. A version-specific guide and screenshots are still needed before documenting the actual workflow.
Placeholder — OCR Studio
OCR Studio — awaiting verified app screenshots and steps for opening a project, selecting input, configuring, checking text and exporting
Placeholder — Scan Studio
Scan Studio — awaiting verified app screenshots and steps for capture/import, cropping, rotation, page order and handoff
Section 16 / 18
Combine books with Merge EPUBs
Merge EPUBs combines multiple EPUB files into a collected book. It is not library synchronization or collaborative merging of simultaneous edits. Start with source EPUBs that already open correctly, then inspect the entire combined book, especially navigation and conflicting styles.
- Keep every original EPUB untouched and back up the active book as ZIP. Start with two small files you are permitted to combine.
- Open More tools → Merge EPUBs and select the desired EPUB files in the picker. Use Ctrl/⌘ for multiple individual files as supported by your operating system. Read the dialog’s options and confirmation before proceeding.
- Set the order using any ordering controls offered. Prefixes such as 01/02 help identify files, but still verify the final order. Do not assume file-selection click order always determines chapter order.
- Start the merge with the dialog’s confirmation action and wait without repeating it. Check the active book name, chapter count, and the beginning/end of each source book in Chapters.
- Inspect duplicate covers and information pages, global CSS, fonts and images—especially same-named assets with different content. Checkpoint the merged result before deleting duplicates.
- Open Metadata & Cover and set the collected edition’s title, authors/contributors, cover and edition details accurately. Review whether the identifier belongs to this output; do not blindly keep the first book’s information.
- Organize Outline so readers can distinguish the source books. Run Health and inspect transitions in Preview, then export and test navigation and Next/Previous in a reading app.
Section 17 / 18
Export and verify before delivery
Export creates a file from your project. Later edits do not update an already-downloaded file; export again to include them. Before delivery, determine the format required by the reader or destination. This guide does not guarantee identical format support across all platforms.
| Format | Choose it when | Check |
|---|---|---|
| Standard EPUB (EPUB 2) | You need a general EPUB; used in the beginner exercise. | Set Health target to EPUB 2 and test the actual reader. |
| EPUB 3 | Your destination requires EPUB 3 or its structural metadata. | Still test navigation, semantics, footnotes and accessibility. |
| Kindle KFX | You need Kindle-oriented output and your environment can generate it. | Read converter limitations/errors and test the destination. A visible option does not prove universal device support. |
| Kobo KEPUB | You are preparing a Kobo-oriented file for your transfer route. | Test the file’s links, reading order and appearance on the target Kobo. |
| Project ZIP | You need a backup or continued editing in EpubCraft. | Choose HTML where offered and test import; do not send it as a reading EPUB. |
Export step by step
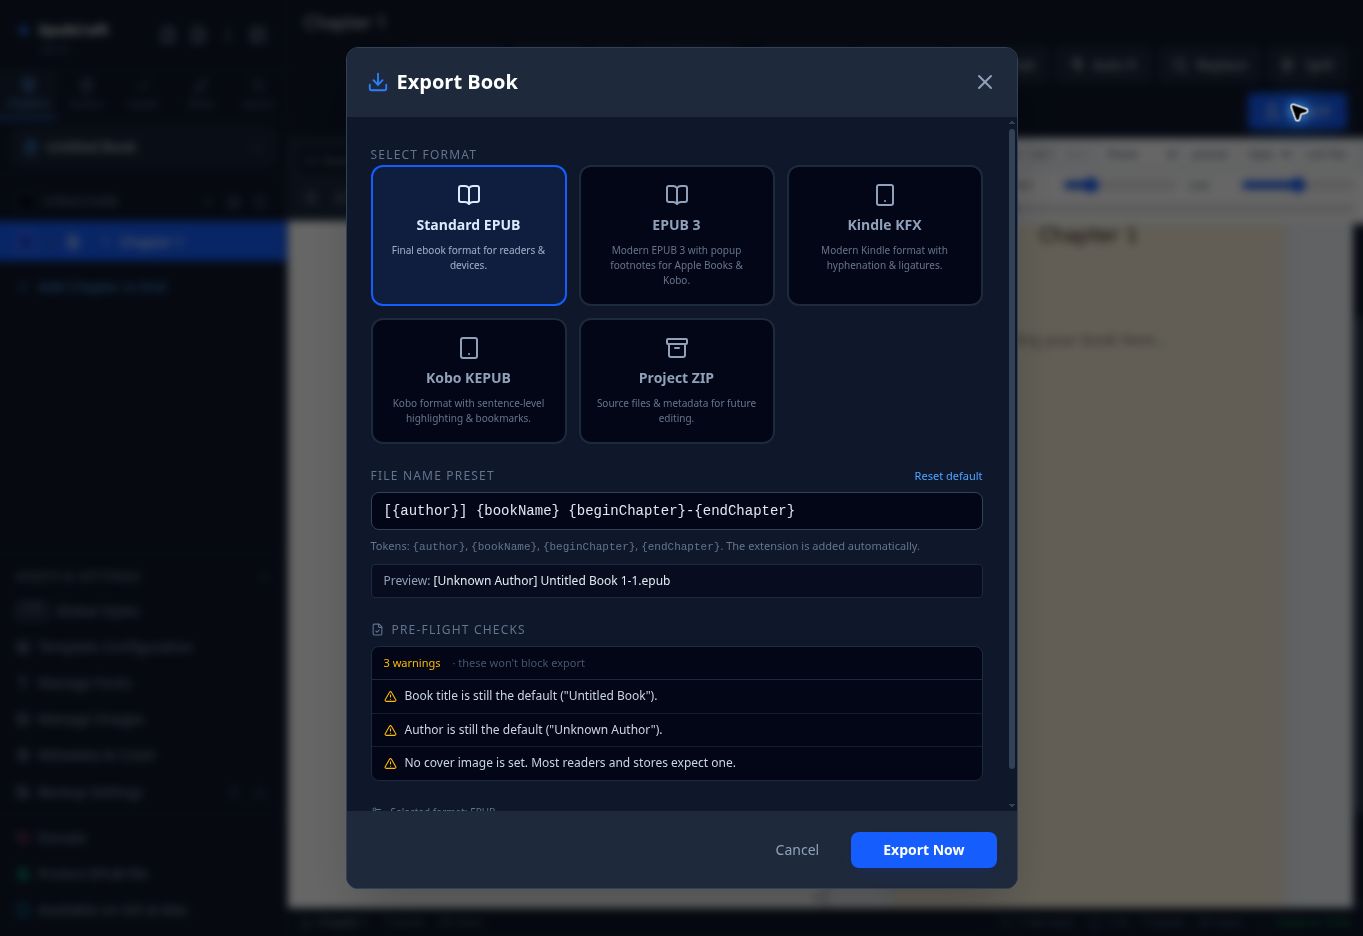
- Review Health, resolve necessary issues, and check Outline and Preview. Click Export on the toolbar; the button avoids possible conflicts with the browser’s Save Page shortcut.
- Choose a format and review the options it reveals. If a chapter range is offered, verify the intended coverage. Do not assume chapter checkboxes always define export scope.
- Inspect Filename Preset and the displayed output name. A preset may use
[{author}] {bookName} {beginChapter}-{endChapter}. Keep variable braces intact and avoid duplicating the extension when the app adds it. - Read preflight, the last check before file generation. Cancel to fix manuscript problems, then reopen Export. Reset default resets export options; it does not repair content.
- Click Export Now once and wait for completion. Check browser Downloads if the file is missing, and verify its name and extension. Renaming .zip to .epub is not a format conversion.
- Open the newly downloaded file, not a similarly named older copy. Check title, cover, TOC, first/last chapters, images and footnotes, then try larger text and dark mode. Fix issues in EpubCraft and export again.
Delivery checklist
- Data: correct Title/Creator/Language, appropriate cover and description, and reviewed identifiers/edition details.
- Structure: all chapters present, correct reading order, working TOC destinations, logical headings and no unintended blank/duplicate cover pages.
- Reading: no missing images/fonts, no overflow, readable colors, working links/footnotes, and human proofreading.
- Retention: keep the latest reading file and a tested Project ZIP. Clearly distinguish older versions you may need before sharing.
Section 18 / 18
Glossary, shortcuts and targeted troubleshooting
Common terms
| Term | Meaning |
|---|---|
| Project / Library | The editable book / the app’s book collection; not automatically a cloud backup. |
| Chapter / Spine / TOC | A content unit / continuous reading order / navigation entries for jumping to content. |
| HTML / Tag / H1–H3 | Content structure / markup identifying an element / progressively nested heading levels. |
| CSS / Template / Asset | Appearance rules / a reusable preset / a supporting file such as an image or font. |
| Metadata / Identifier | Descriptive book information / an identifier for the work or edition, not a filename. |
| Alternative text / Accessibility | Text conveying an image’s meaning / enabling access for people with different ways of perceiving or operating content. |
| Regex / Capture group / Scope | A text-matching pattern / a parenthesized captured part that can be reused / the chapters an operation affects. |
| Checkpoint / Import / Export | A recorded recovery state / loading a file for editing / generating a file from a project. |
Shortcuts: use the right context
Use the on-screen button if a shortcut conflicts with your browser. Focus the editor before text commands and check your version’s tooltips. Windows/Linux generally use Ctrl and macOS often uses ⌘; some commands and modes may differ.
| Action | Shortcut to verify in the tooltip |
|---|---|
| Export | Ctrl/⌘ + S — if the browser opens Save Page, cancel and use the app’s Export button. |
| Undo / Redo | Ctrl/⌘ + Z / Ctrl/⌘ + Shift + Z |
| Find | Ctrl/⌘ + F — check whether it searches the editor or the manual/browser page. |
| RegEx Replace / Split Chapter | Ctrl/⌘ + Shift + H / Ctrl/⌘ + Shift + K |
| Bold / Italic | Ctrl/⌘ + B / Ctrl/⌘ + I with text selected in a supported mode. |
Symptom → check → next action
| Symptom | Safe checks and actions |
|---|---|
| Missing menu or unchanged tab | Close obstructing onboarding/dialogs, select the tab and verify the panel heading. On narrow screens open the sidebar; distinguish Source/Visual from Code/Split/Preview. |
| Book missing after refresh | Check the same domain, browser, profile and library. Do not clear site data as a fix. Import a saved ZIP if needed; history may be unavailable after site data loss. |
| Blank import or garbled text | Confirm the selected file and chapter. Inspect Source for content. For garbled TXT, preserve the original, save a UTF-8 copy in a text editor, then try importing that copy. |
| Title changes but heading/TOC stays old | Check Chapter Title, the on-page H1 and the Outline label separately. Do not regenerate all titles for a single rename. |
| Font missing or poor Thai wrapping | Check Manage Fonts, CSS font-family and regular/bold variants. Try a Thai-capable font and inspect the reader’s publisher-font setting. Test the exported file. |
| Image missing | Check Manage Images and the chapter’s src reference. If recently deleted/renamed, restore or reinsert the asset. Alt text describes an image; it does not repair its link. |
| Regex mismatch or incorrect split | Inspect Source for p versus h1, spaces, attributes and nesting. Stop and restore before retrying; test one chapter, not the entire book. |
| Large file or stalled export | Do not repeat the command; wait and read errors. Save a ZIP if possible. Inspect large images and unused fonts before optimizing/deleting. Do not deliver a downloaded file that fails to open. |
| Preview looks right but the reader does not | Confirm you opened the latest file. Check export format, CSS and reader preferences. Simplify complex rules one at a time in a copy, then re-export and test. |
Get help and check references
Before reporting a problem, record the app version, browser/device, file type, minimal repeatable steps, expected versus actual result, and an unobstructed screenshot. Share a small sample without private manuscript content or secrets.
Donate supports the developer; Discord opens the community; Available on iOS & Mac opens app information; Protect EPUB file opens an external service. Review terms and data handling before sending files outside the app. File protection is not backup or quality validation.
References: EpubCraft Web and project documentation. Some documentation describes older versions, so this guide also uses Web v4.2.0 screenshots and marks version-dependent details. It does not claim testing across every platform.